Baseball is a Game of Movement
Drills
Core Concepts - Drills
(The) Base

Covering a Base
On any given play a player has the responsibility to either (1) Play the Ball (2) Cover a Base, or (3) Back-up a Base. In most cases when an infielder is not playing the ball their responsibility is to Cover a Base.
The moment an infielder recognizes they are not going to be playing the Ball, the Base becomes their singular focus until they are in position at the base to receive a throw. We instruct our players to “Cover The Base With Your Eyes”.
This means the player takes their eyes off the ball (the ball is another player’s responsibility), turn to face the base, focus their eyes on the base, and sprint to the base as quickly as possible, not taking their eyes off the base until they arrive.
Once arriving a the base, THEN the infielder turns and faces the ball. We tell our players, “Get to the base first. Then you watch the game from there.”
We want them on the same side of the base as the ball, in a Ready Position prepared to take a throw.
Keep the Ball Moving
The ball is constantly in motion. No standing in place holding the ball. The moment a player handles the ball they immediately do one of two things:
- Throw the ball
- Run with the ball towards the middle of the infield
Other than recording an out, the priority of the team in the field is to get the ball to the middle of the infield as quickly as possible. When the ball is in the middle of the infield, it is an equal threat to runners at each base.
The two instances that players commonly stand and hold the ball:
- Outfielders not knowing where to throw the ball
- Infielders, after making a play at a base
Outfielder
Each step closer to the middle of the infield, the more of a threat the outfielder with the ball becomes. And the shorter the distance to throw once they determine where the ball needs to go.
Infielder
There often are multiple runners on the base paths. The instant an infielder catches a throw at a base or makes a tag on the runner, they want to turn and begin moving towards the middle of the infield (taking them closer to the other three bases), prepared to throw, while Looking for Other Runners.
Mini Diamond - Super Tool
A valuable tool for teaching many of the fundamental aspects of the game is the Mini Diamond. We use this to train the player positioning, movement and communication aspects of the game.
A Mini Diamond is 20’-25' square; we modify, larger or smaller, depending on the activity. It is constructed using cones, throw down bases, ball caps, a hoodie, a leaf, anything. When we compact the teaching/learning environment, distractions are reduced, communication improves, and players get many more repetitions.
Examples of drills using a Mini Diamond:
-
Relays
-
Backing-up and Base coverage responsibilities
-
Bunt Defense
The throwing and catching skills needed to execute a play on a full sized diamond are trained daily during 'Playing Catch Practice'.
Moving the Ball (Options)
Most kids consider only one option for moving the ball around the field: throwing overhand.
We want to teach the three ways to move the ball:
-
Overhand Throw - for medium and long distance throws
-
Underhand Toss - used when the player is approximately 25’ or closer to their target
-
Carry the Ball - when a fielder can reach a base before the runner OR when the runners are no longer attempting to advance on the base paths.
Turn Glove Side
In situations when a player is fielding, catching, or picking up a ball with their back to where they need to throw the ball, they Turn Glove Side to prepare to throw. When throwing the ball a player wants the 'glove side’ of their body pointing at their target.
The most efficient way to get lined up to throw is for a player to turn in the direction of their glove. Only a 90 degree turn is required to go from having one's back to the target to being lined up to throw. Also, the momentum of the turn leads into the throw.
However, kids tend to turn the opposite direction. Reasons:
(1) Turning to the Glove Side is ‘blind’. When making the 270 degree turn to the Throwing Arm side, in the process, the player is fully facing their target and ‘see’ their target well before throwing. They are more ‘comfortable’.
(2) The momentum of a thrown ball usually pulls players to their throwing arm side, so they just ‘go with it.
The problem with turning to the throwing-hand side is it is 270 degrees and the momentum of the turn is away from where they need to throw. Most of the time the player doesn’t complete the turn, doesn’t get properly lined up to make the throw, and doesn’t use their legs (Move Their Feet) to power the throw. The result is a weak, inaccurate throw.
Instruction:
- Move your Feet to Catch. We want to catch the ball on the Glove Side of the body.
- Use the teaching phrase, "Turn Glove Side".
Common situations that a player has their back to the target:
- Relay throws
- Pitcher fielding the ball
- Replaying muffed ground balls
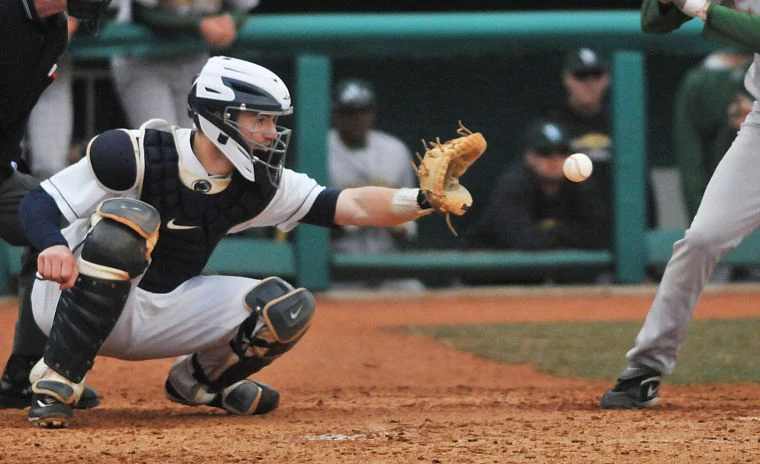
- Catcher retrieving wild pitches and passed balls
Underhand Toss
This is a Major League Skill. In any given MLB game the underhand toss is utilized 8-10+ times. On the smaller diamond, where the players are positioned closer to each other, there is a higher percentage of situations where the distance the ball needs to be transported a short distance. When a player takes possession of the ball within 20’-25’ from the base, they use the Underhand Toss technique.
Most of us are familiar with the scene where the player with the ball is not far from the player they want to throw to; we see uncertainty: “How hard do I throw the ball when my teammate is so close?”
Educating our kids that an underhand toss is an alternative option, results in kids successfully completing many of these ‘simple’ plays, which in fact are very difficult when throwing the ball overhand is the only option in the mind of the player with the ball.
Ball, Base, Back-Up (BBB)
(The) Base

Infield Base Coverage


Catcher = Forth Baseman

P, SS, 2b Always Move Towards the Ball

MIF & P - Balls to LF/RF


MIF & P - Ball to CF

Pitcher Movement Responsibility

Backing-Up (OF + Pitcher)

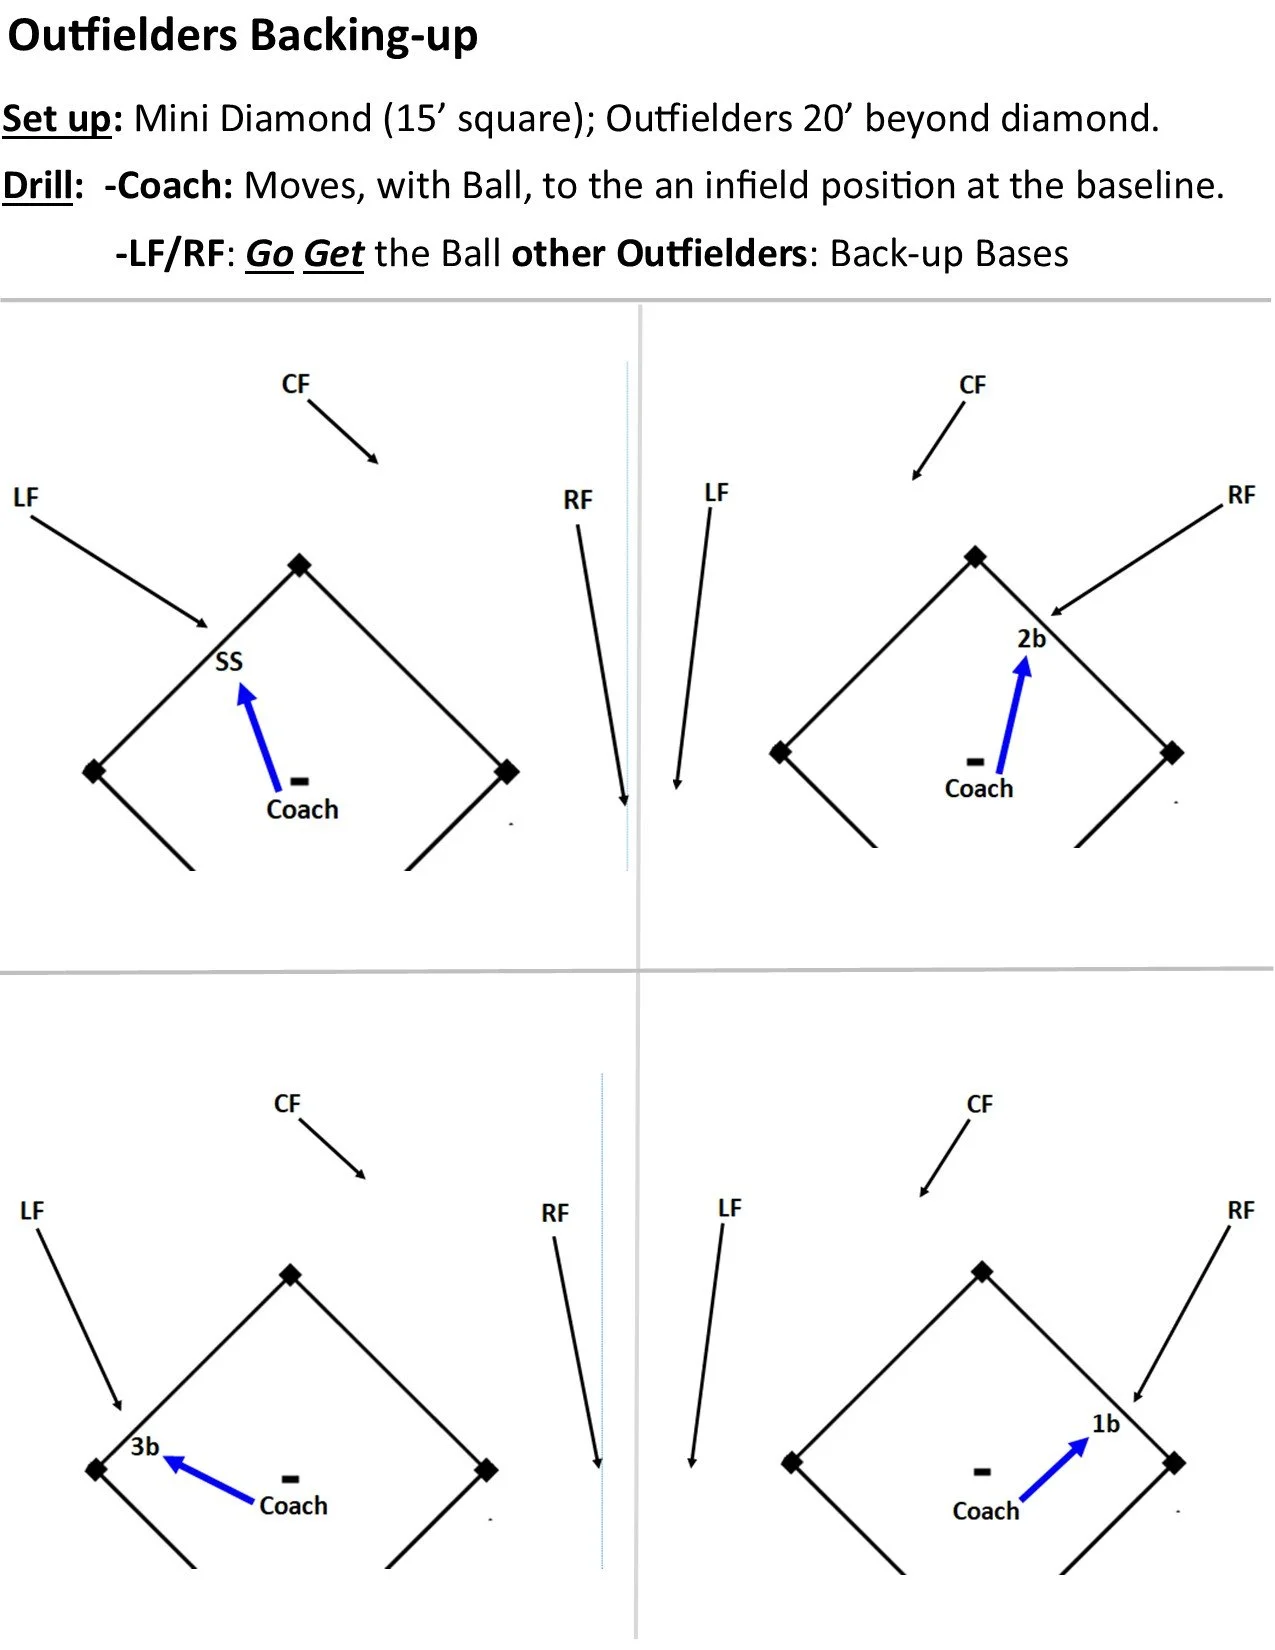
3 Players, 1 Base (w/OF Backing up)
This drill teaches players the fundamental rule of Coordinated Team Defensive Play: (1) Ball, (2) Base, (3) Back-up. Beyond the immediate benefit of training the three players on the side of the infield, where the ball is hit, to coordinate their responsibilities, and train the outfielder to aggressively move and participate in the play, it establishes the mindset and habit of movement and ‘thinking’ the game.
The mindset and habits established in the 3 Players, 1 Base Drill carries over to all other situations in the game.
Following the catch at the base, the player aggressively shuffles off the base, in a Power Position, towards the middle of the infield, ‘Looking for Other Runners’.
(Regardless of the drill situation, following any play at a base, we want our players to always come off the base immediately after making the play. We are creating the habit of being aware that there may be other runners involved in the game looking to advance to the next base. This habit leads to our fielders maintaining control over the game, and making it clear to the players on the other team that we are always prepared to make a throw if they choose to take the risk of advancing)
There are a variety of combinations for running the 3 Players, 1 Base Drill. Many are illustrated below.
Note: If you are at the Coach/Machine Pitch level, consider for your first practice or two, to run the Ball or Base Drill (found below this section). This primes the kids up to the concept of moving/running. We need our kids locked into the idea that when they aren’t getting the ball, they are needed to Run from their position to another spot on the field.
The basic concept of this drill is, there are three players on each side of the field (the two infielders and the Pitcher, who always breaks towards the corner base on the side of the field the ball is hit). Each of those three is responsible for one of the three defensive responsibilities:
- Ball
- Base
- Backup
Whenever possible include a Left Fielder or a Right Fielder in the drill. That player develops the habit of always sprinting towards the ball (I am going to GO GET the ball mindset). They also learn that there are circumstances when the ball is hit so so softly that it will not get out of the infield. Once they recognize this, they route themselves to get into position to back-up.
Note: Some of these plays can be difficult to execute when the batter is a fast runner. Speed is difficult to defend. We won’t get the out every time; that is baseball/softball.
The first example of the drill has a detailed explanation. The info following subsequent drills only address the points unique to that situation and or provide details in a less formal format.
Keep in mind, when setting up this drill and assigning each player a responsibility, that in many game situations, initially, two players will go after the ball until it is recognized which will actually field the ball.
We need to alert the players of the situation in advance of each drill repetition of where we are going to direct the ball. We especially need to make it clear, when we are going to deliver a ball between players, which one we want to field the ball for that repetition. It is recommended that the same situation is run multiple times before changing to a new situation. In a given practice, assuming 5-10 minutes running the drill, we will only address 2-3 different situations.
Avoid the temptation of ‘tricking’ the players by running these drills without alerting the players in advance of the situation they are practicing. When the players know in advance what they are doing, they can execute at full speed, have greater success, get more repetitions and build confidence. (This also eliminates the possibility of more aggressive players messing up the situation we are trying to create/teach.)
[Possibly later in the season, when the players are well-schooled in their responsibilities, we can challenge them by tossing out a ground ball without telling them where the ball is going to go. But it is recommended to always prep the players in advance of what we want to be working on; keep in mind that we have limited time and want good reps.]
Most of these plays have the players using an Underhand Toss. The drill diagrams do not illustrate the tossing player ‘Following Their Head’ (continuing to run towards their target after making the toss). This is so the diagrams remain as clean as possible when viewing.
Note: In instances where the player covering the base has not yet tuned to face the player with the ball, the tossing player continues running towards the base until they see that the receiving player is ready to take the throw.
***If you are working with a Coach Pitch or Machine Pitch group, it is recommended that the ‘Pitcher’ be referred to as the ‘Runner’. At this level of play that position never ‘Pitches’, but they do Run a lot
Whenever we run drills involving a ball hit to the first base side of the infield ALWAYS set out a bucket, 10’-15’ from the first base bag, to represent the runner. Seeing the bucket there is a constant reminder of the possibility for a collision. Anytime a player is crossing into foul territory, to back-up, they learn to look out for the runner.

Tell the players in advance who the ball is going to; the other players, when the ball is delivered by the coach, sprint to fulfill their defensive responsibilities.
This is a routine ground ball to the Second Baseman. Basic; it is pretty straight forward who is responsible for Ball, Base, and Back-up.
The pitcher breaks directly toward the first base bag. Only after they see the base is being covered do they redirect their path to back-up (never assume). The Pitcher must run behind the base runner coming up the line.
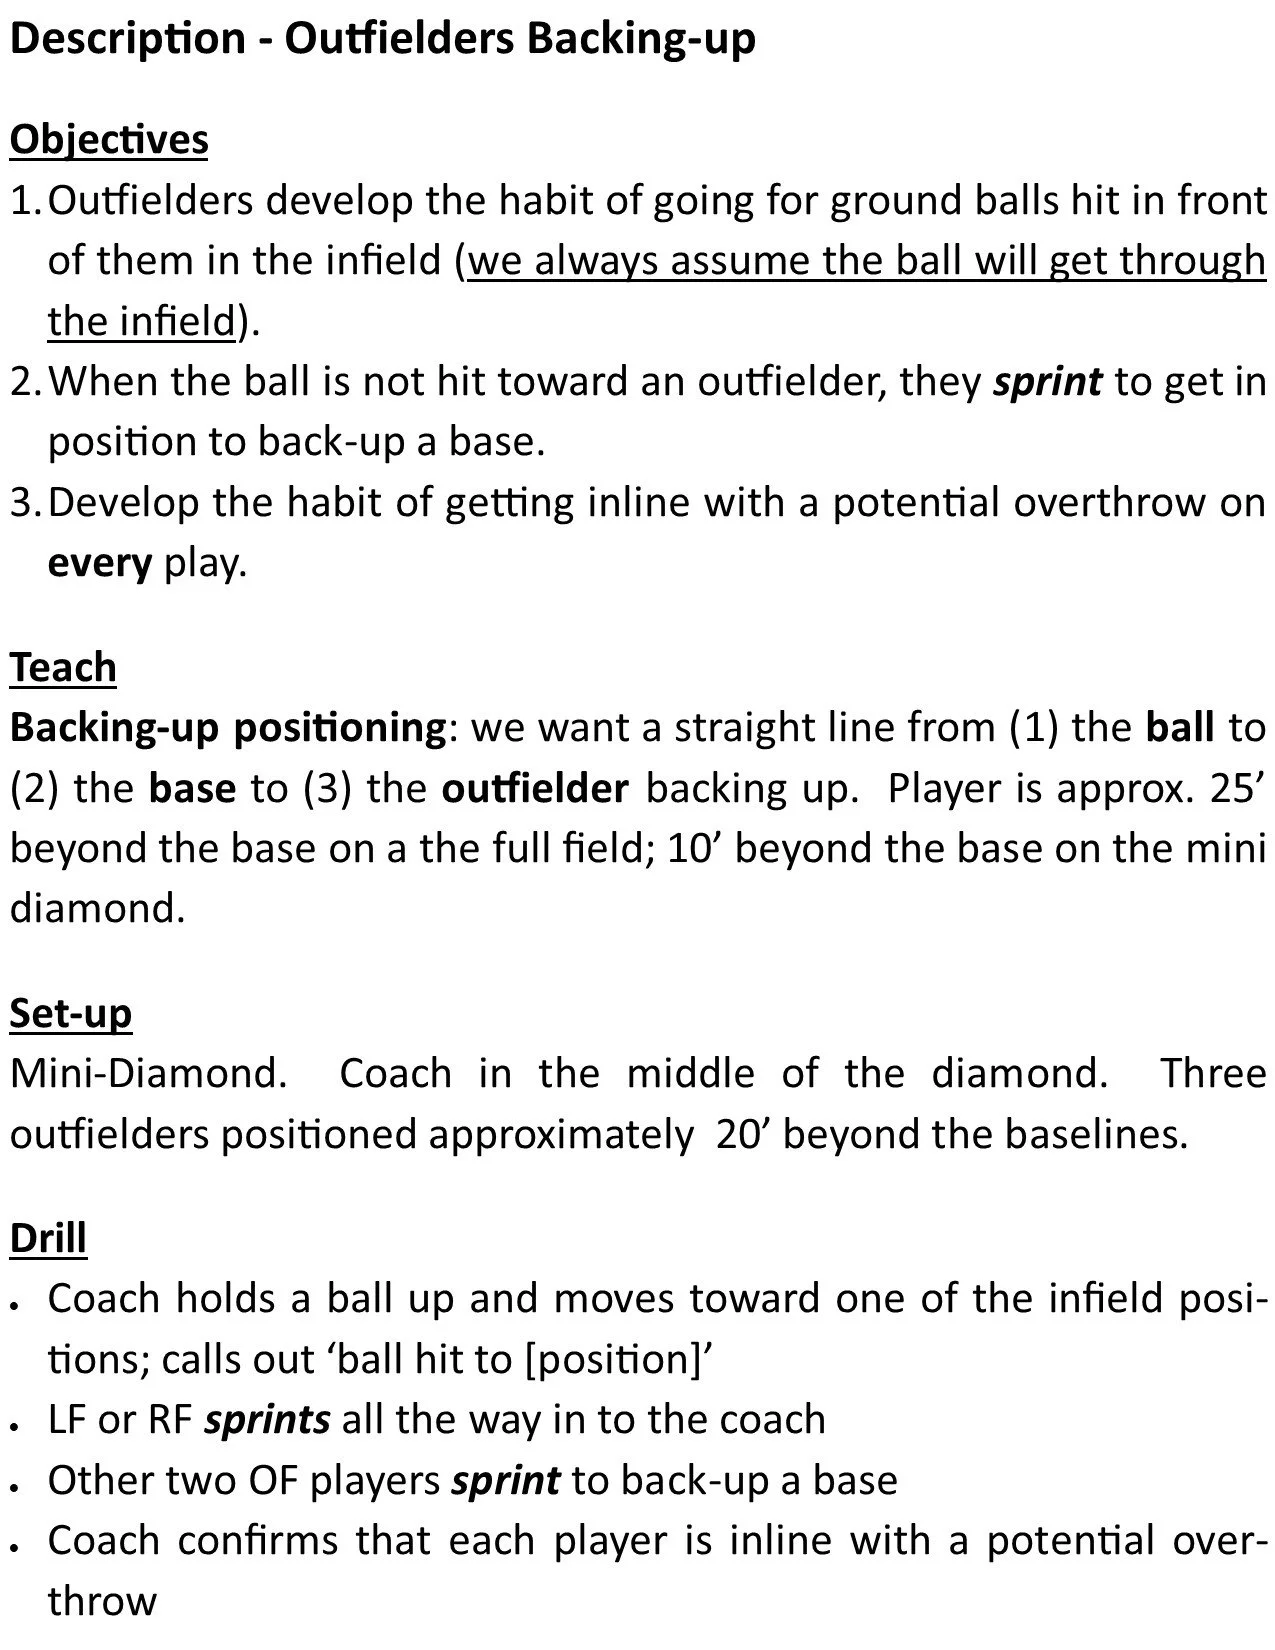
OBJECTIVES
The Pitcher understands when a ball is hit in the infield, and they don’t field the ball or cover a base, they get into position to Back-up. Plays on the first base side require the Pitcher to Go Behind the Runner (to avoid a collision).
The Right Fielder recognizes their responsibility to GO GETthe BALL every time it is hit in front of them. This drill has the ball fielded by a player in the infield. In a game, the ball often gets past the infielders; we want outfielders fielding the ball as close to the infield (bases & base runners) as possible.
TEACH
- Three defensive responsibilities: (1) Ball (2) Base (3) Back-up
- Baseball is a ‘sprinting game’. The players not fielding the ball sprint full speed to fulfill their defensive responsibilities.
DRILL
Coach: Roll a ground ball to the first base side* of the Second Baseman. Instruct the Pitcher to NOT field the ball.
Second Baseman:Field the ball under control. Speed up and run towards the base and deliver the ball using an Underhand toss.
First Baseman: Sprint tocover the base ‘With Your Eyes’.
Pitcher: Sprint towards first base, then break into foul ground, going behind the Runner/Bucket. Get in-line with the throw.
Right Fielder: Sprint to the ball until it is cleanly fielded. Then break towards a Backing-up position. (Unless the Pitcher falls down, which can happen, the Right Fielder won’t be needed to back-up the play.
*The ball can also be delivered to the right of the second baseman giving them the opportunity to make a longer, overhand throw (and increase the chances that the player Backing-up gets involved in the play).

This play has a ball splitting the difference between the positioning of 1b and 2b.
We instruct the First Baseman (1b) to ‘go after the ball, but don’t field it’. We are simulating a situation where 1b is drawn away from 1B in an attempt to field the ball (which we always want them doing aggressively in games). We also instruct the Pitcher to not field the ball.
1b then turns back, to the home plate side of 1B, and sprints to foul territory (behind the runner/bucket), in line with the throw from 2b, to Back-up the throw.
Pitcher (P) breaks hard for the ball. Because they didn’t field the ball, they continue in the same direction and sprints to cover the Base.
Second Baseman (2b) fields the Ball to their left, continues their momentum towards 1B, executes an Underhand Toss; continues towards the base after making the toss (‘Follow Your Head’).
[Rule of Thumb: ground balls to 2b’s left, in most cases (on the 60’/70’ diamond), are delivered to 1B using an Underhand Toss.
Right Fielder (RF) sprints towards the ball (are we sure it is going to be caught by an infielder in a game??)
This play has a ball splitting the difference between the positioning of 2b and 1b; hit hard enough to easily pass P, but slowly enough that 1b can get to the ball.
We instruct the Second Baseman (2b) to ‘go after the ball’ (which we always want them doing aggressively in games).
2b is now out of the play, which is why we need the outfielder trained to always sprint towards ground balls hit in front of them.
First Baseman (1b) breaks hard for the ball; fields the Ball, Turns Glove Side, executes an Underhand Toss; continues towards the base after making the toss (‘Follow Your Head’). Peels off to the infield side of 1B.
(1b hollers, “Mine!”, communicating to 2b that 1b can field the ball. 1b is the subordinate player; they have their back to the base. When players are communicating on who will play the ball, the subordinate player uses the phrase ‘Mine’, the dominant player, who is facing the base, uses the phrase, “Get Out!”.)
Pitcher (P) sprints to the Base.
Right Fielder (RF) makes an aggressive step towards the ball (always), then sprints to foul territory to Back up.
(Usually we want the Outfielder to focus entirely on sprinting towards the infield on any ball hit in front of them. However, when it is clear the ball has no chance of getting past the infielders, we want the Outfielder to default to backing up.)

This play has a ball splitting the difference between the positioning of P and 1b; but more to a spot that puts 1b in a better position to field the ball.
Second Baseman (2b) sprints to the Base.
First Baseman (1b) breaks hard for the ball; fields the Ball, Turns Glove Side, executes an Underhand Toss; continues towards the base after making the toss (‘Follow Your Head’). Peels off to the infield side of 1B.
(1b hollers, “Mine!”, communicating to P that 1b can field the ball. 1b is the subordinate player; they have their back to the base. When players are communicating on who will play the ball, the subordinate player uses the phrase ‘Mine’, the dominant player, who is facing the base, uses the phrase, “Get Out!”.)
We instruct the Pitcher (P) to ‘go after the ball’ (which we always want them doing aggressively in games …but not field the ball in this drill). P is now out of the play, which is why we need the outfielder trained to always sprint towards ground balls hit in front of them.
Right Fielder (RF) makes an aggressive step towards the ball (always), then sprints to foul territory to Back up.
(Usually we want the Outfielder to focus entirely on sprinting towards the infield on any ball hit in front of them. However, when it is clear the ball has no chance of getting past the infielders, we want the Outfielder to default to backing up.)

This play has a weakly hit ball a bit to the Pitcher’s (P) left. It is clear that P is the player fielding the ball.
First Baseman (1b) sprints to the Base.
Pitcher (P) fields the Ball to their left, continues their momentum towards 1B, executes an Underhand Toss; continues towards the base after making the toss (‘Follow Your Head’), but peels off to the infield side of the base to avoid getting in the path of the Base Runner.
Second Baseman (2b) makes an aggressive step towards the ball (always), then sprints to foul territory to Back up.
Right Fielder (RF) makes an aggressive step towards the ball (always), then sprints to foul territory to Back up.
(Usually we want the Outfielder to focus entirely on sprinting towards the infield on any ball hit in front of them. However, when it is clear the ball has no chance of getting past the infielders, we want the Outfielder to default to backing up.)

This play has a ball splitting the difference between the positioning of P and 1b.
We instruct the First Baseman (1b) to ‘go after the ball, but don’t field it’. We are simulating a situation where 1b is drawn away from 1B in an attempt to field the ball (which we always want them doing aggressively in games).
1b is now out of the play, which is why we need the outfielder trained to always sprint towards ground balls hit in front of them.
Pitcher (P) breaks hard for the ball; fields the Ball, continues their momentum towards 1B, executes an Underhand Toss; continues towards the base after making the toss (‘Follow Your Head’). Peels off to the infield side of 1B.
(If P sees that they and 1b will arrive at the ball at about the same time, P hollers, “Get Out!”, communicating to 1b that P is going to field the ball. P is the dominant player in this situation; they are facing the base. 1b is the subordinate player; they have their back to the base.)
Second Baseman (2b) sprints to the Base.
Right Fielder (RF) makes an aggressive step towards the ball (always), then sprints to foul territory to Back up.
(Usually we want the Outfielder to focus entirely on sprinting towards the infield on any ball hit in front of them. However, when it is clear the ball has no chance of getting past the infielders, we want the Outfielder to default to backing up.)
3 Players, 1 Base Drill (Balls to the Third Base Side)
At our level of play we are often in a situation with runners on first and second with less than two outs. This sets up the potential for a force out at third base. However, many teams do not take advantage of the opportunity (or prepare for it).
There are two solid reasons to pursue a force out at third base:
-
There are instances where it is the easiest play
-
Keeping a runner off third gives us breathing room. In the case of a Wild Pitch or Passed Ball we are not giving up a run.
(At the 11-12 year old level, when we have a pitcher who can throw a good off-speed pitch, when there is no base runner at third, they can throw their off-speed pitch without fear of giving up a run if that pitch were to get past the catcher. Maintaining that pitch as a legitimate option makes the pitcher more effective.)
We don’t have as many options on this side of the diamond as when balls are hit to the first base side. On the first base side we are going after the batter who doesn’t get started as quickly as a base runner starting from a base. Also, the Shortstop is usually one of our stronger athletes, so they are positioned deeper, and further away from the corner base. Give this positioning, it is challenging for them to get to third base, to take a throw, ahead of the base runner.
However, we still have four plays to work on that can produce an out on the lead runner going to third base: (1) 6-5 Play, (2) 6-1 Play, (3) 5-1 Play, (4) 1-5 Play.
Balls hit to the third base side, between the Pitcher and Third Baseman are where we need practice using the “Mine” - “Get Out!” system for ‘Ground Ball Communication’.
When two players are going after a ball hit between them, the player with their back to the base is subordinate. They call out, “Mine” to indicate they intend to field the ball. The dominate player is the one more facing the base. If they choose to make the play, they holler, “Get Out!”.

Tell the players in advance who the ball is going to; the other players, when the ball is delivered by the coach, sprint to fulfill their defensive responsibilities.
This is a routine ground ball to the Shortstop’s right. Basic; it is pretty straight forward who is responsible for Ball, Base, and Back-up.
The pitcher breaks directly toward the third base bag. Only after they see the base is being covered do they redirect their path to back-up (never assume). The Pitcher must run behind the base runner coming up the line.
OBJECTIVES
The Pitcher understands when a ball is hit in the infield, and they don’t field the ball or cover a base, they get into position to Back-up.
The Left Fielder recognizes their responsibility to GO GETthe BALL every time it is hit in front of them. This drill has the ball fielded by a player in the infield. In a game, the ball often gets past the infielders; we want outfielders fielding the ball as close to the infield (bases & base runners) as possible.
TEACH
-
Three defensive responsibilities: (1) Ball (2) Base (3) Back-up
-
Baseball is a ‘sprinting game’. The players not fielding the ball sprint full speed to fulfill their defensive responsibilities.
DRILL
Coach: Roll a ground ball to the third base side of the Shortstop. Instruct the Pitcher to NOT field the ball.
Shortstop:Field the Ball under control. Speed up and run towards the base and deliver the ball using an Underhand Toss.
Third Baseman: Sprint tocover the Base ‘With Your Eyes’.
Pitcher: Sprint towards third base, when they see the Base is covered, break into foul ground to Back-up. Get in-line with the throw.
Left Fielder: Sprint to the ball until it is cleanly fielded. Then break towards a Backing-up position. (Unless the Pitcher falls down, which can happen, the Left Fielder won’t be needed to back-up the play.

This play has a ball splitting the difference between the positioning of 3b and SS.
We instruct the Third Baseman (3b) to ‘go after the ball, but don’t field it’. We are simulating a situation where 3b is drawn away from 3B in an attempt to field the ball (which we always want them doing aggressively in games). We also instruct the Pitcher to not field the ball.
3b then turns back, to the home plate side of 3B, and sprints to foul territory, getting in line with the throw from SS, to Back-up the throw.
Pitcher (P) breaks hard for the ball. Because they didn’t field the ball, they continue in the same direction and sprints to cover the Base.
Shortstop (SS) fields the Ball to their right, continues their momentum towards 3B, executes an Underhand Toss; continues towards the base after making the toss (‘Follow Your Head’).
[Rule of Thumb: ground balls to SS’s right, in most cases (on the 60’/70’ diamond), are delivered to 3B using an Underhand Toss.
Left Fielder (RF) sprints towards the ball (are we sure it is going to be caught by an infielder in a game??)
Full Team Movement - BBB (& 20' Ground Balls)

SET UP
- Mini Diamond: 25’ Square
- Infielders a bit further from bases, relatively speaking, than normal (create room for them to Move on each play).
- Coach with a Wiffle Ball (players don’t wear gloves); moves around the infield depending on where they will deliver the ball on each play.
OBJECTIVE
Massive reps in a short time, reacting to games situations, following Ball, Base, Back-up rules.
DRILL
Coach tosses a Ball to a player on the field. Other players cover a Base or Back-up.
VALUE
Players are learning ‘How to Play the Game’, together, as a Team. They quickly recognize that each position has importance on each play, regardless of the situation.
- Close proximity of players allows for them to See how their single responsibility fits into the context of Coordinated Team Movement.
- Players are better able to adapt to the responsibilities of other positions.
- Get the players reps at different positions. They recognize the formula, ‘Ball, Base, Back-up’, applies to Movement Responsibilities for all positions on the field. Players are more comfortable and confident when playing different positions.
Ball or Base (Tee-Ball)
This drill is used at the Coach/Machine Pitch level also. Preliminary drill, before introducing 3 Players, 1 Base Drill.

Ball or Base Drill: 1b & 2b
SET UP:
1b: 15’ from first base
2b: 25’ from first base
Coach: Half way between home plate and the first baseman
DRILL:
Coach rolls the ball (not far; maybe 10’) forcing 1b to run to a point 25’ from first base.
2b - (Who IS not fielding the ball,) runs as fast as possible to first base (but does not touch the base). Turns towards the ball in a ‘Ready Position’, ‘catches’ the ball (’Reach forward to Catch’), then STOMPS on first base.
1b - Runs to the ball, picks it up (‘Feet Wide to Catch’), runs towards first base with the ball in their bare hand (‘Move Your Feet to Throw”). Makes an underhand toss to the second baseman from 10’-12’ away; keeps running towards the base (’Follow Your Head’). Be alert of the runner coming up the line.
***The drill can also be run with the 2b fielding and 1b covering first base.

Ball or Base Drill: SS & 2b
SET UP:
SS: 25’ from second base
2b: 25’ from second base
Coach: On the second base side of the pitcher position
DRILL:
Coach rolls the ball (not far; maybe 10’) forcing 2b to run to a point 25’ from second base.
SS - (Who is not fielding the ball,) runs as fast as possible to second base (but does not touch the base). Turns towards the ball in a ‘Ready Position’, ‘catches’ the ball (’Reach forward to Catch’), then STOMPS on second base.
2b - Runs to the ball, picks it up (‘Feet Wide to Catch’), runs towards second base with the ball in their bare hand (‘Move Your Feet to Throw’). Makes an underhand toss to the Shortstop from 10’-12’ away; keeps running towards the base (’Follow Your Head’).
***The drill can also be run with SS fielding and 2b covering second base.

Ball or Base Drill: 3b & SS
SET UP:
3b: 15’ from third base
2b: 25’ from third base
Coach: Half way between home plate and the third baseman
DRILL:
Coach rolls the ball (not far; maybe 10’) forcing 3b to run to a point 25’ from third base.
SS - (Who is not fielding the ball,) runs as fast as possible to third base (but does not touch the base). Turns towards the ball in a ‘Ready Position’, ‘catches’ the ball (’Reach forward to Catch’), then STOMPS on third base.
3b - Runs to the ball, picks it up (‘Feet Wide to Catch’), runs towards third base with the ball in their bare hand (‘Move Your Feet to Throw’). Makes an underhand toss to the Shortstop from 10’-12’ away; keeps running towards the base (’Follow Your Head’).
***The drill can also be run with SS fielding and 3b covering third base.
1-5 Play

This play has a weakly hit ball a bit to the Pitcher’s (P) right. It is clear that P is the player fielding the ball.
Third Baseman (1b) sprints to the Base.
Pitcher (P) fields the Ball to their right, continues their momentum towards 3B, executes an Underhand Toss; continues towards the base after making the toss (‘Follow Your Head’), but peels off to the home plate side of the base to avoid getting in the path of the Base Runner.
Shortstop (SS) makes an aggressive step towards the ball (always), then sprints to foul territory to Back up.
Left Fielder (LF) makes an aggressive step towards the ball (always), then sprints to foul territory to Back up.
(Usually we want the Outfielder to focus entirely on sprinting towards the infield on any ball hit in front of them. However, when it is clear the ball has no chance of getting past the infielders, we want the Outfielder to default to backing up.)
5-1 Play

This play has a ball splitting the difference between the positioning of 3b and SS; hit hard enough to easily pass P, but slowly enough that 3b can get to the ball.
We instruct the Shortstop (SS) to ‘go after the ball’ (which we always want them doing aggressively in games).
When SS clearly sees that 3b is getting to the ball, SS sprints to foul territory to Back-up. Note: on this play it is rare for SS to make it to their Backing-up position prior to the throw being made. However, if they are sprinting and an overthrow occurs, they are well on their way to retrieving the ball. They can get to it quick enough to deter the base runner from attempting to advance for home plate.
Third Baseman (3b) breaks hard for the ball; fields the Ball, Turns Glove Side, executes an Underhand Toss; continues towards the base after making the toss (‘Follow Your Head’). Peels off to the home plate side of 3B.
(3b hollers, “Mine!”, communicating to SS that 3b can field the ball. 3b is the subordinate player; they have their back to the base. When players are communicating on who will play the ball, the subordinate player uses the phrase “Mine”, the dominant player, who is facing the base, uses the phrase, “Get Out!”.)
Pitcher (P) sprints to the Base.
Left Fielder (LF) makes an aggressive step towards the ball (always), then sprints to foul territory to Back up. In this particular situation, SS can get delayed in moving towards a Backing-Up position. It does happen, in this situation, where LF ends up retrieving a missed throw.
(Usually we want the Outfielder to focus entirely on sprinting towards the infield on any ball hit in front of them. However, when it is clear the ball has no chance of getting past the infielders, we want the Outfielder to default to backing up.)
3-4 Play


4-6 Play


5-6 Play


Base Running
Fly Balls 'Half Way'


Running Through First Base


Sliding


This action requires momentum and a level of fearlessness. Some kids need time to get acclimated to the idea of trying to slide.
Note: The safest place to practice sliding is on wet/damp grass. Sliding is a fun activity for wrapping up a practice.
STEP 1
Shoes OFF for safety (even tennis shoes can catch in the ground, leading to an unnecessary injury). And the kids Love to run in their socks.
STEP 2
Players sit down with both legs extended straight out (facing the coach). Instruct them to tuck one foot/ankle under their opposite knee. They make a ‘number 4’ with their legs.
The player will pick the leg that is most comfortable to slide on. Coach doesn’t demonstrate; this could lead to player(s) copying the coach and tucking the leg that isn’t their natural preference. (It doesn’t hurt to suggest the kids try both options.)
STEP 3
Roller Coaster Practice…
Part 1) Throw hands up (like riding a roller coaster) and yell “Wheeeeeeeeee!”
Part 2) Slowly lean back while throwing hands up; players end up laying on their backs.
STEP 4
Four players to a group. Set out 3-4 cones, etc. to serve as bases. Line the players up 40’- 45’ from the ‘bases’ (we don’t want them running any more than required for them to get up to full speed. (Less running means more Repetitions before they run out of gas.)
Set a marker approximately 7’-8’ in front of each base to indicate where they begin their slide (this distance may vary a foot or two depending on age of players).
Have the first player in each group Go! When the first player is Completely up off the ground and clear of the running lane, the next player goes. IMPORTANT: make players go around the outside of the drill to return to their group (no running back between groups; avoid collisions).
Instruction:
(1) Run as fast as you can!!
(2) When reaching the marker in front of the base, begin leaning back, lowering hips and throw hands up above head.
(3) Lead heel should be held a few inches off the ground, with player’s weight on their buns. When sliding into a regular base (2” tall) the heel catches the top edge of the base.
Leg injuries occur during sliding when players catch their heel/cleat in the ground before reaching the base.
The other common sliding injury is jamming a thumb in the ground, which is why we teach players to throw their hands up above their head.
Touch Point on the Base

Turns & Touches


Catcher
Blocking
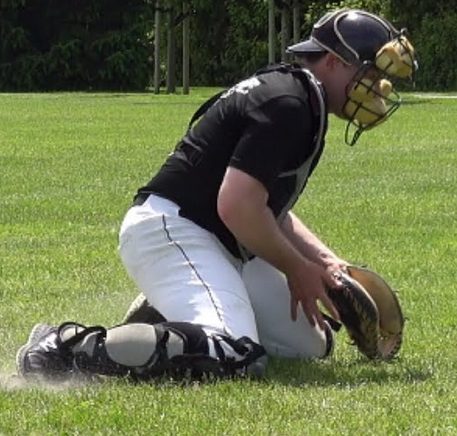
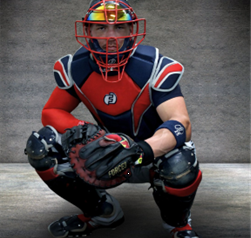
Blocking Position: a catcher wants to remain as ‘big’ as possible when blocking the ball:
-
Knees wide apart
-
Butt between heels
-
Glove and throwing hand between knees
1. Fingers of the glove pressed slightly into the ground; slightly in front of the palm of the hand
2. Throwing hand behind glove
-
Body bent slightly forward at the waist, but remaining vertical and ‘tall’
-
Elbows outside the body/torso
-
Chin tucked to the chest; mask facing down
Notes:
-
In this fundamental blocking position, the catcher makes a ‘C’ shape with the front of their body.
-
When landing in a blocking position, the catcher wants their body/muscles to relax as much as possible. When the ball hits a relaxed body it ‘dies’ and lands near the catcher. When the ball hits a tense body, it can bounce far away from the catcher. Developing the ability to relax the body when reaching the blocking position takes some time and repetition.
-
When blocking, we ell our catchers to ‘catch the ball with your body’. this mindset is the first step to a catcher resisting the urge to lift their glove off the ground in an attempt to catch the ball off the bounce. When doing this, the catcher opens of the space between their legs for the ball to go through. This also takes the body out of position, which often leads to the ball bouncing off to the side, instead of in front of the catcher.
Practice Space
It is not necessary to practice blocking skills at home plate. Foul ground on the first or third base side, or even in the outfield grass, works fine. Draw a plate in the dirt, use a throw down base or something else to represent home plate. In a team practice setting, being comfortable working on catcher skills anywhere on the field allows other members of the team to address their drill needs while the catcher(s) gets in their work. Our objective when structuring practice is keeping every player busy developing skills at all times.
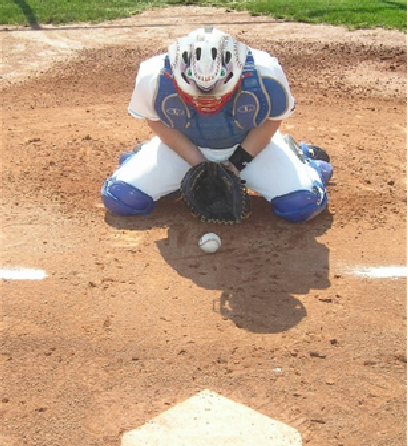
Fundamental Blocking Position
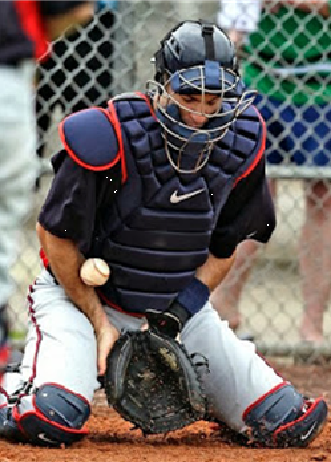
Block the Ball with the Body
The drills below are done without a ball. Reasons:
Our ability to consistently, and accurately, bounce a ball in the right spot is low.
-
Getting the players the massive reps needed to master this skill will unnecessarily beat up their bodies
-
Players can focus on the blocking action. We first need to develop the movement of the skill, before introducing a ball
-
Practicing without a ball enables the players to work in grass (or other soft surface) providing them will a softer landing spot than dirt or artificial turf provides
-
Enables us, as coaches, to work with catchers anywhere on the practice field. Often the infield/Home plate area are needed for drills involving other players on the team
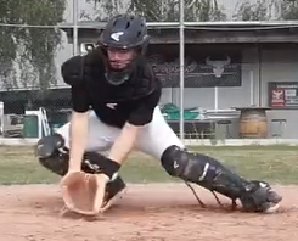
Blocking Balls in Front
Drill x5-8
From the stance, the catcher simply rocks forward onto their knees, landing in a good blocking position. Have the catcher experiment with giving a thrust using their feet, so to land a few inches further forward. The closer the catcher is to the bounce, the less room for an off-line bounce to get past them.
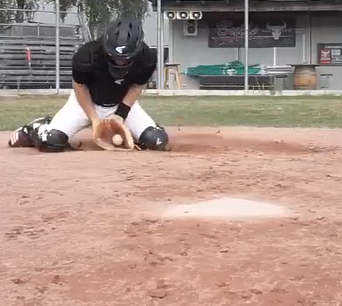
Blocking Balls to the Side
First, communicate to the catcher(s) that we want them to develop the ability to block balls that are up to 8” wide of home plate (this means getting the center of their torso 8” wide of the plate). We do not expect them to block balls that are more than 8” wide of the plate (though it would be great if they did). This is important for two reasons:
-
Gives them a realistic goal (for a kid), and focus, for their drill work
-
Relieves pressure of unrealistically high expectations (from the coach and of themselves)
Drill Objectives
-
Develop agility and quickness through repetition.
-
Consistently finishing in a sound blocking position with the body angled slightly in towards home plate - 10-15 degrees
Drill x10 each side | Repeat
THE SKILL: The blocking action involves a thrust of the hips, to the side, past the foot. The feet and body will follow automatically.
Work exclusively to one side, then work to the other side. We want a player to execute the same action (to their left or right) repeatedly to train that single movement.
First couple of workouts make the hip action the exclusive focus; that is the key aspect to the blocking action. Then we can add a focus of pushing with the off-side foot to assist the lateral hip thrust.
The action of leading with the hips is new, and possibly, unknown by most kids. It is important that they first develop a feel for the hips leading the action of moving the body laterally.
Note: when working with a player struggling to lead with their hips, have them rock side to side in their Stance (this was the first skill be introduced on Day 1) to gain a sense of the lateral movement of the hips. The skill of rocking side to side is the foundation of the lateral hip thrust.
Practice blocking movements in grass; easier on the body
Catcher = Fourth Baseman

The catcher's defensive position is in front of Home Plate. The Catcher, squatting behind Home Plate, is not in their ‘position’; that is where a catcher catches pitches. A catcher plays defense in front of Home Plate. We call Home Plate ‘Fourth Base’ and call the Catcher the ‘Fourth Baseman’.
Catcher Communication Responsibilities
-
Call out number of OUTS and location of RUNNERS before each new batter steps up to the plate. This keeps all players in the field engaged.
-
After the ball is put into play: holler, in a loud voice, to which base the ball is to be thrown (Infielders ‘Echo’ the call on balls in the outfield). If there is no reasonable chance to record an out at a base, the Fourth Baseman hollers, “Eat It, Run It In!”.
-
Communication on Cut-Relay Plays to Home Plate.
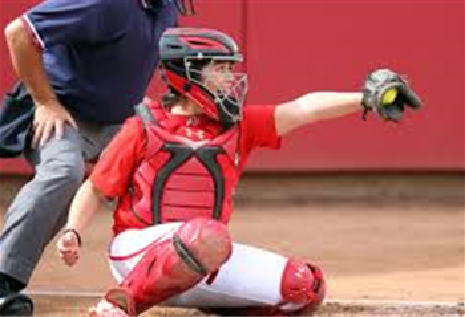
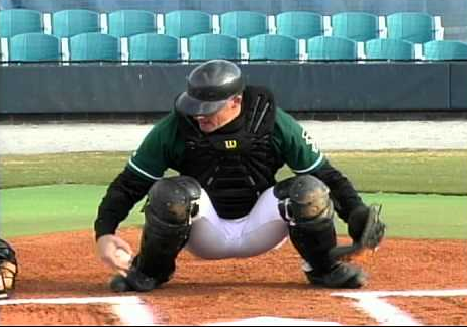
Receiving
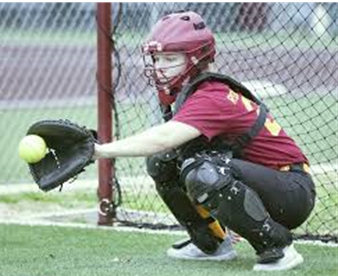
Elbow is above the catcher’s knees. Elbow is pointing out (horizontal); this allows the glove arm to move freely and not get tied up between the catcher’s knees. Thumb is pointing down. (on a high pitch the glove fingers point upward somewhat).
This picture also illustrates the arm and glove position when receiving low pitches in the middle of the strike zone. …the Elbow remains up and pointing horizontally.
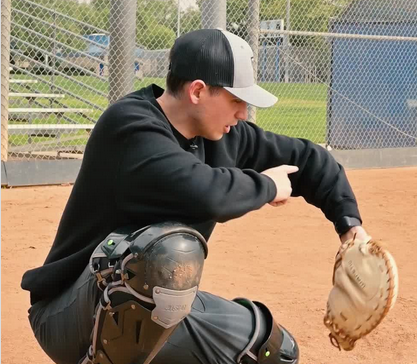
Receiving a Pitch on the Glove Side
When moving the glove to pitches located on the edges of the strike zone, the elbow moves along an arc that is located above and outside the knees. Maintaining the elbow in this arc is particularly important on pitches to the catcher’s Glove Side. Note in this picture that the Elbow is Outside the catcher’s knee. This movement results in the catcher’s thumb pointing horizontally or upward.
DRILL
While in their squat, the catcher moves their glove along an arc, back and forth slowly, from one side of the strike zone to the other. The primay objective is training the glove elbow to stay within this arc throughout the drill action. Initially, this is challenging for a young player. Executing this action requires shoulder strength. Doing the drill increases shoulder strength and coordination.
Move back and forth along the arc three times. Rest, then repeat the drill 3-5x. Working at this, daily, for a couple of weeks results in the catcher developing the skill of maintaining proper arm (Elbow) position when catching pitches in all locations.
Stick the Pitch
When receiving a pitch, we want the to maintain the arm position and glove location when the ball is caught. This gives the umpire a better look at the pitch location. Enhances the ‘appearance‘ the pitch. Note: Do not Stick an pitch clearly out of the zone.
How long does the catcher hold their glove position after catching the pitch? As long as it takes to say the phrase, “Look at that”.
Sticking the pitch not only helps the umpire see the pitch location, when sticking the pitch the (young) catcher is more focused on the catch, since they are going to hold their glove position for a moment after receiving the ball.
Collapse the Wrist
When the ball is impacting the glove, the catcher ‘gives’ at the wrist joint (not the elbow). This softens the impact of the ball hitting the glove, which increases the percentage of balls caught. Also, when collapsing the wrist, the glove tilts towards the strike zone, adding to the appearance of the pitch being a strike.
DRILL
Coach stands approximately 20’ from the catcher, tells them which side of the strike zone they will toss the ball. Coach tosses the ball firm and level using an Underhand Toss technique. The toss to the catcher will be consistently more accurate tossing underhand than overhand
10x each side | Repeat, if time allows
Shift to Receive
Earlier, when discussing the stance, we talked about the need for a catcher to be balanced and able to shift side to side in their stance. When receiving pitches on the edges of Home Plate, a catcher wants to shift their body to the side of the plate the pitch is headed, prior to the ball reaching the plate. The shift is only a few inches. However, this slight shift puts the ball more to the center of the body. On a pitch that is outside, but near, the strike zone, the shift of the body gives the appearance that the ball crossed the plate. Mastering this body shift when catching pitches near the edges of the strike zone can increase the number of strike calls in favor of the pitcher during a game.
Stance
Fundamentals
- Heels a couple inches outside of hips
- Toes pointed slightly out (throwing hand foot may turn out a bit more)
- Legs relaxed, allowing butt to sit low near heel level
Objective
- Catcher is balanced in their stance.
- Check: a catcher needs to be able to comfortably rock side to side 4”-6” while in their stance
DRILLS
Stand and Squat
Catcher sets the width and positioning of their feet while standing. Squats down for fives seconds, then stands up. This is repeated 10x. While in the process of standing and squatting, the catcher adjusts their foot position, looking for what is most comfortable for them. The repetition of being in a squatting positions conditions their leg muscles and joints. A week of daily work is needed for a young catcher’s body to find (and become comfortable) in a squatting position that works best for them.
Rock Side to Side
While in their squatting position, the catcher rocks side to side a few times. This action, in combination with the Stand and Squat activity, builds leg strength while helping the player to find the foot position in their stance that works best for them.
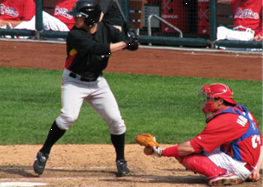
Relationship to the batter: with arm fully extended, the glove should be no more than a couple inches from the batter’s back foot. Many youth catchers sit too far back from the batter. Getting hit by a swinging bat is not something a kid wants to experience. Initially they may be a bit apprehensive setting up closer to the batter.
Solution: Put your catcher in their squat. Stand as a batter, so their relationship to your stance is correct. Make a few slow swings. They, and you possibly, will see that they are safe at that depth. Show them pictures of where MLB catchers set up behind batters.
Benefits of a catcher positioned closer to the batter:
- Reduces the distance the pitcher has to throw
- Fewer bounced pitches; reducing the chances of a pitch getting past the catcher
- Pitches reach the batter lower in the strike zone
- Catcher is closer to the field of play, the bases and base runners; fielding and throwing is simplified
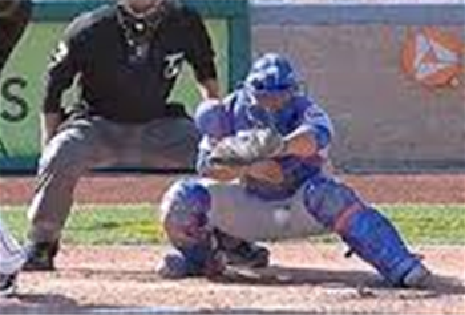
Typical Youth Catcher:
- Feet are too close together, resulting in poor balance and limited mobility.
- This catcher could be set up 6 Feet closer to the batter. We talk about the number of pitches kids can safely throw. Are we considering How Far they are throwing? A catcher set up with a correct relationship with the batter relieves a massive amount of physical stress on a pitcher.
- Furthermore, with a catcher set up closer to the batter (and pitcher) the psychological boost to a pitcher (of seeing the catcher a much shorter distance away) is huge.
- Question: How many pitches bounce between where this catcher Should be set up and the point where they are set up in this picture?
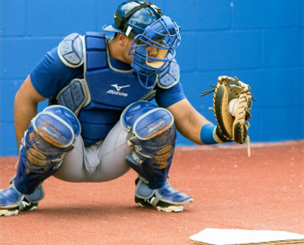
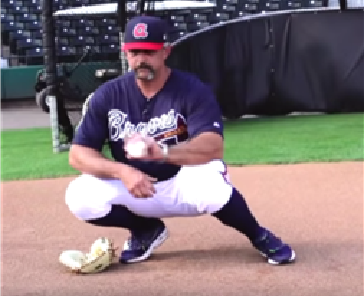
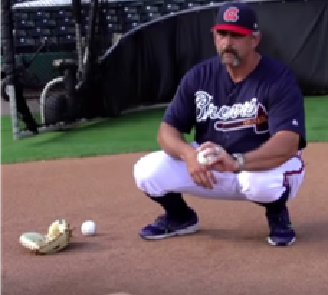
Target
Youth catchers do not have the body (shoulder) strength that teens, college, pro players possess. We want to take this into consideration when training our young catchers. A youth catcher can give a ‘target’ with their elbows on their knees and the back side of the glove facing the pitcher. NOTE: there is nothing magical about showing the pitcher the palm side of the glove when giving a target. The back side of the glove provides as large of a target as the palm side.
When presenting a target in this fashion, we limit the amount of time a young catcher’s glove-shoulder must support the weight of the arm and glove.
DRILL
Catcher sets up in their stance with elbows resting on their knees. A coach, standing ~20'‘ away, goes through the pitching motion, stopping short of throwing the ball. When the catcher sees the pitcher’s throwing hand coming up above their shoulder/head, the catcher slowly (fluidly), and in a controlled manner, lifts their glove-elbow a few inches above their knee level, while extending their glove arm, presenting the glove towards the pitcher.
The objective is the catcher developing the timing of presentation of their glove just prior to the pitch being delivered. Mastery of this action (and its timing) results in the catcher’s glove-shoulder needing to support the Glove and Arm for less than a second. The energy saved is dedicated to receiving, blocking, and throwing; while maintaining their stamina for multiple innings or an entire game.
Repeat 3x. Allow the catcher(s) to stand up to stretch out their legs. Then do a few more sets of three repetitions. Time required: 5 minutes or less.
This drill can be done with all your catchers at the same time.
Wild Pitch / Passed Ball Communication

Fly Balls
Drop Step


Fly Ball Communication


Perpendicular Toss (Fly Balls)

Toss Drills (Fly Balls)


Ground Balls
20’/50’ Ground Balls
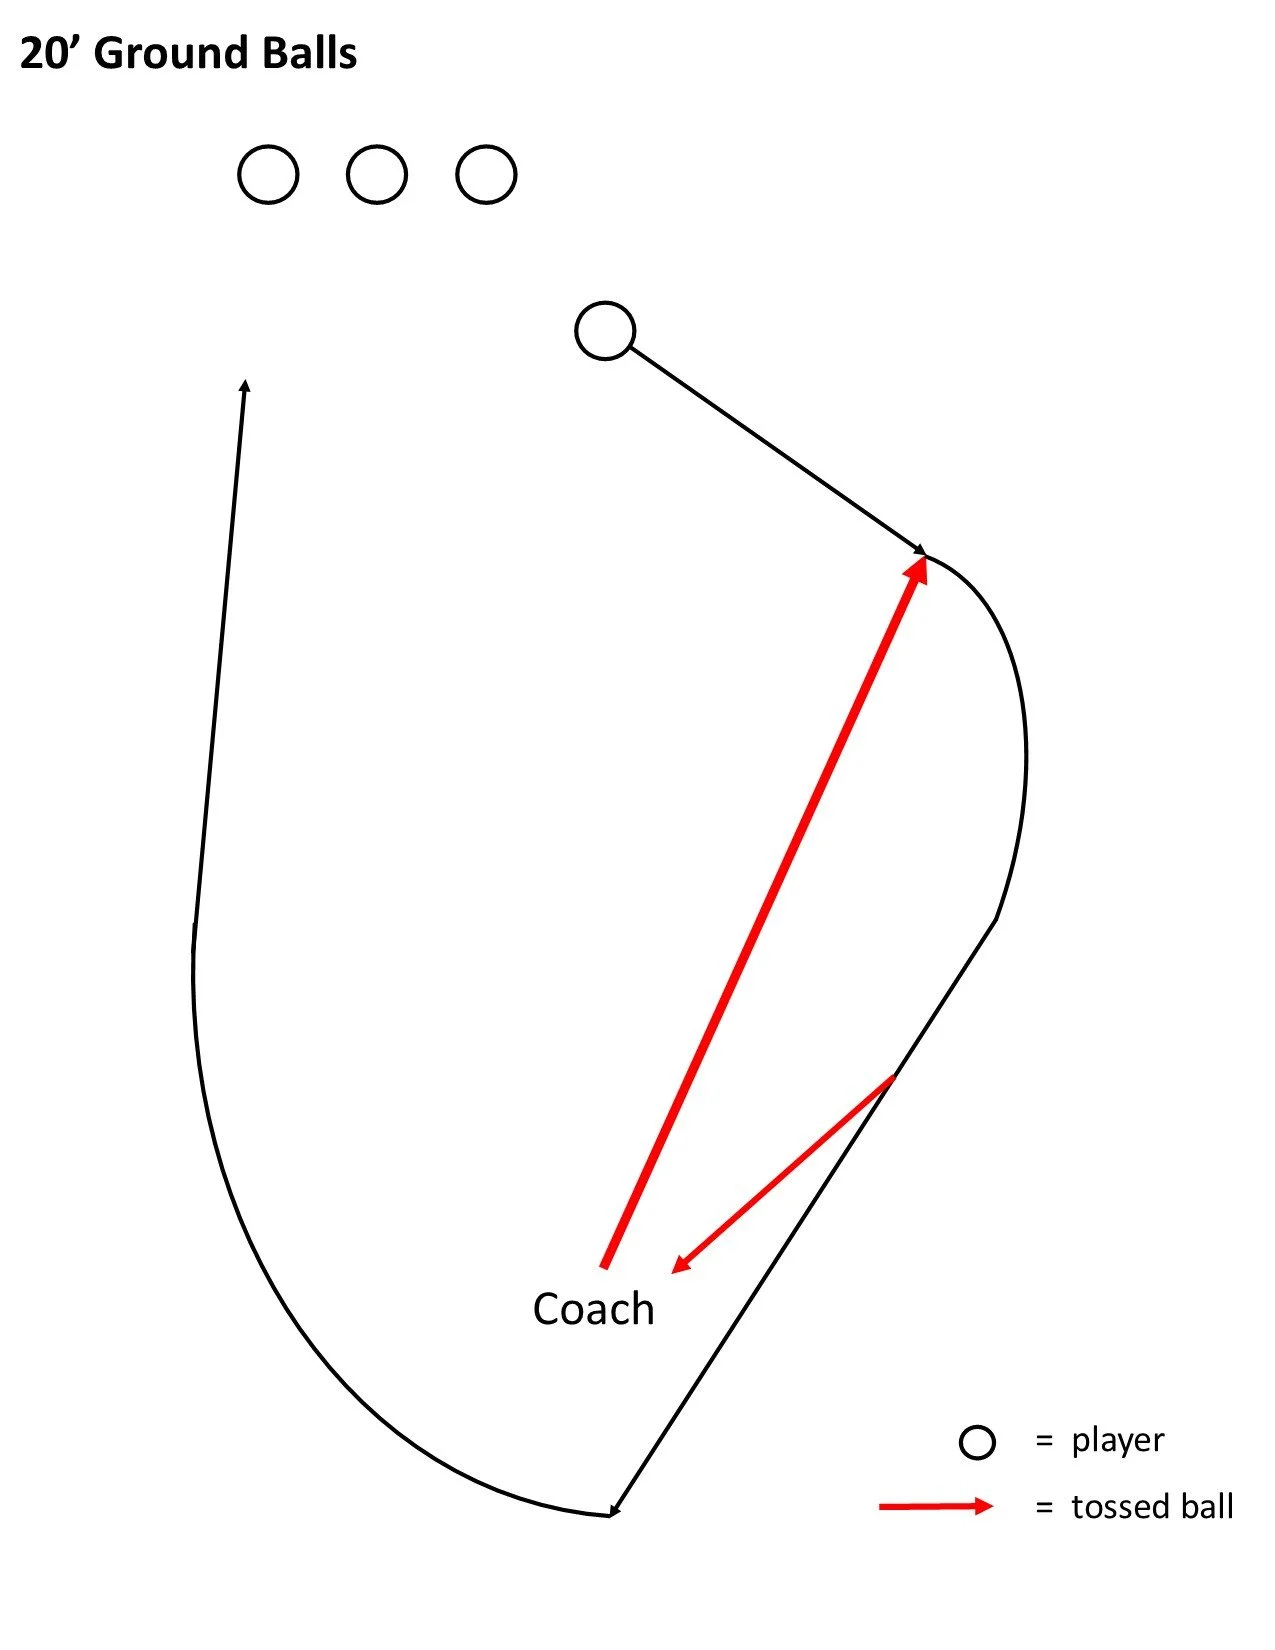

VIDEO - Underhand Toss (watch: 0:00-0:10)

21 Ground Ball Weave


3-6 Play
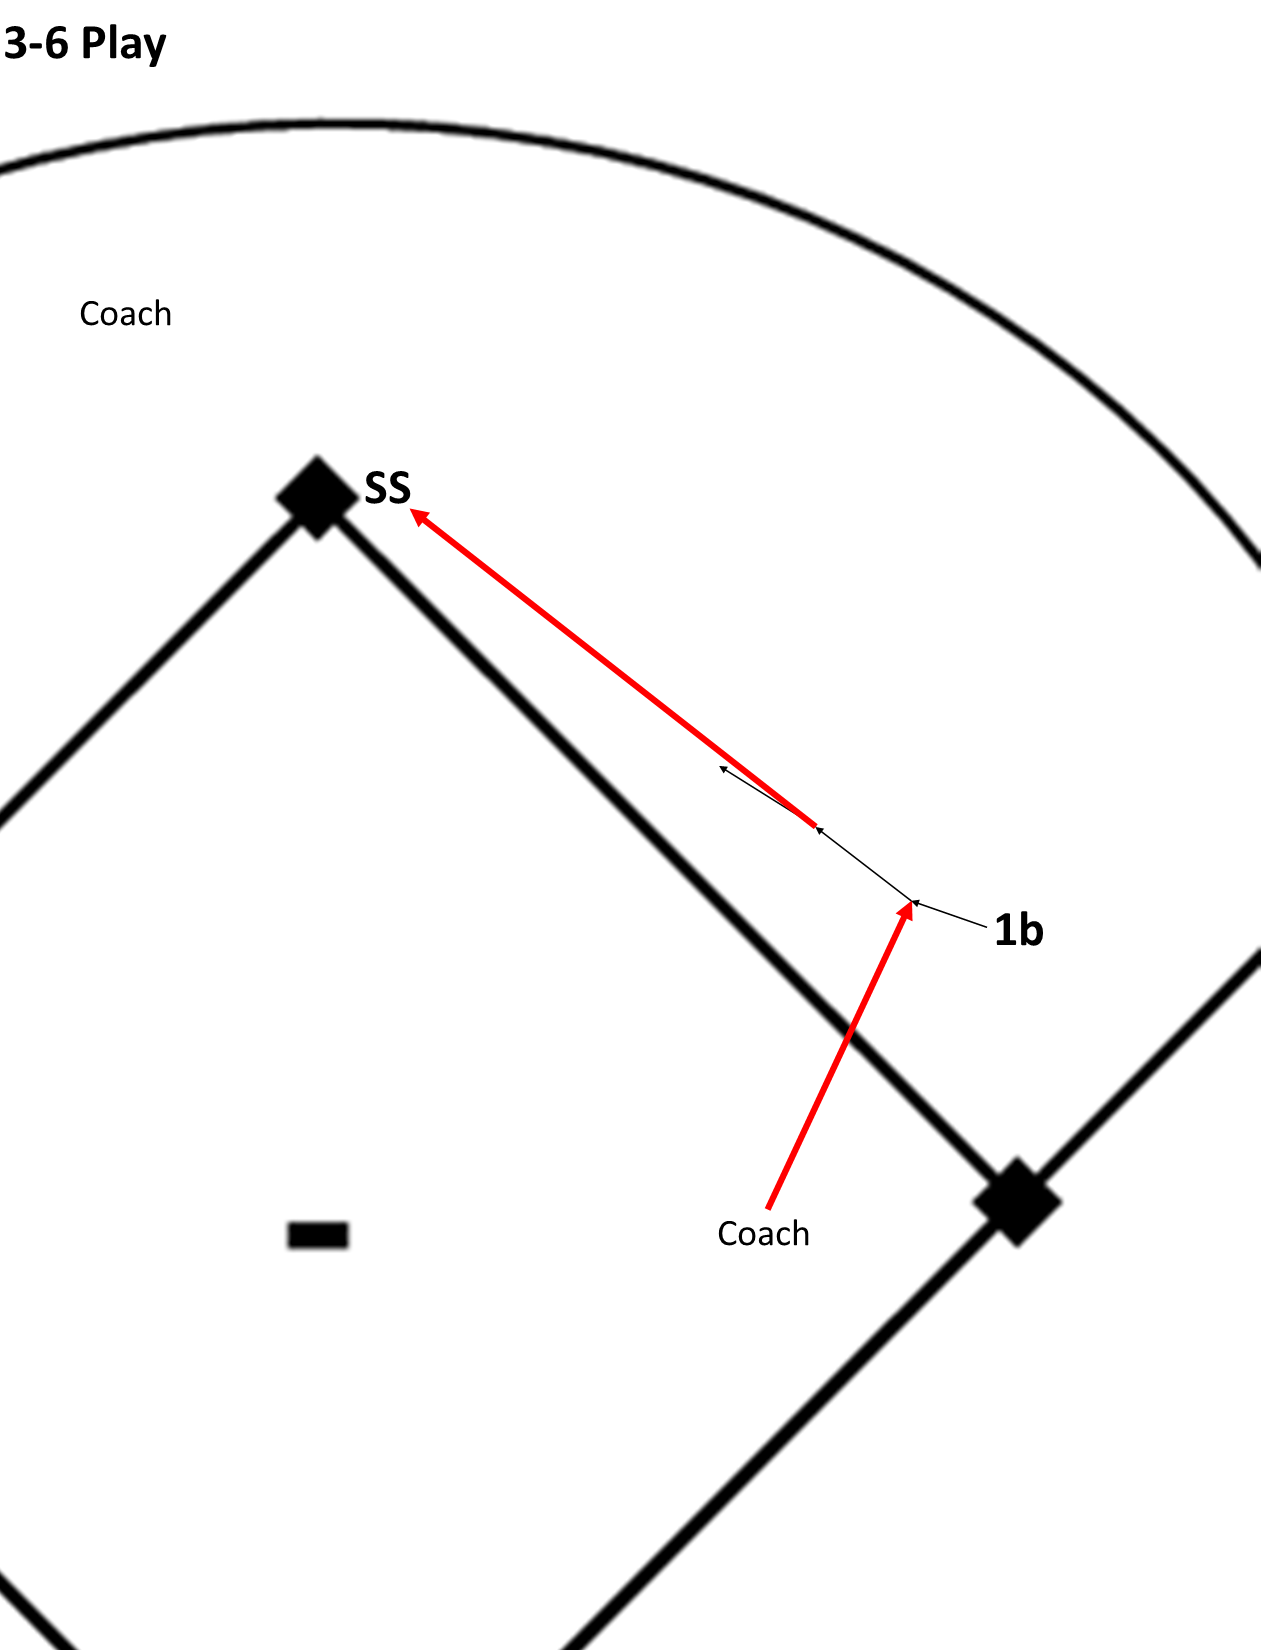
A common flaw in throws made by kids is not generating, and maintaining, Momentum Straight towards their target. A play that is especially challenging (from the standpoint of footwork discipline) is a Right-handed First Baseman making a throw to second base for a force out …the 3-6 Play.
Objective
With a base runner at first base and the ball hit to the First Baseman, we want to get the lead runner out at second base (keeping them out of scoring position), rather than going to First Base for the out.
Through repetition, our First Basemen develop confidence that they can successfully make a play on the lead runner.
Footwork
After fielding the ball, the First Baseman steps across their right foot with their left foot. The end of this action has their glove-side shoulder facing second base (their target).
Make a quick, powerful shuffle straight towards second base (Move Feet to Throw)
Throw with extra emphasis on the wrist snap. The effort in the throwing action is ‘Medium’ with the arm; ‘Fast’ with the wrist ...an accelerated action: arm-wrist.
Allow the momentum of the body to continue straight towards second base, for a couple of steps, after making the throw.
The effort with the legs and the momentum after making the throw are critical points for making an accurate throw. It is the responsibility of the coach to constantly remind the players to ‘Move Your Feet’ and ‘Continue Momentum Straight Towards the Target’.
If available, put an extra coach beyond second base. This coach, with great emphasis, motions to the first baseman to continue their momentum towards the target after the throw is made. Remember, young kids think throwing is exclusively an arm action; we need to train them to maximize their leg strength.
Drill Set-up
First Baseman: 10’ off the base/foul line, either:
-
10’ behind the baseline (running between first and second bases)
-
A couple feet in front of the baseline
Coach: 20’ from the First Baseman
Shortstop: on the same side of the baseline as the First Baseman (we do not want the throw to cross the path of the runner). Heel of the foot closest to the baseline next to the front, outside edge of second base (not touching the base)
Coach #2 (if available): Approximately 15’ beyond second base
Extra players: to rotate in at First Base and Shortstop (ideally just one extra player at each position; we don’t want players standing around ‘waiting their turn’). This is a drill that is run as part of a ‘3 Groups Drill’.
Drill
Coach: roll the ball 4’-5’ to the First Baseman’s right.
First Baseman: field the ball, execute their footwork and throw (our main objective is to develop the footwork for this play).
Shortstop: sets up in a Ready Position, Moves Feet to Catch (if necessary - Ball First, Base Second), Reaches Forward to Catch, slides foot against, or onto, the edge of the base.
…rotate next set of players into the drill
Note 1: if you want to work players at both positions, the First Baseman, following their momentum, continues to second base. Shortstop rolls the ball back to the coach while running to a waiting spot near first base.
Note 2: If the throw gets past the Shortstop, Do Not chase the ball (the coach has plenty of extras; we don’t want to delay moving on to the next drill repetition)
Ground Ball Fielding Technique
(‘Your feet make your hands work’)
Footwork is the foundation of sound ground ball fielding technique. We want the feet moving throughout the process of approaching, catching the ground ball, and throwing the ball ...‘Your feet make your hands work’.
- Feet: ‘Fast, Slow, Fast’ - fast to the ball, slow down to catch the ball, fast feet (momentum straight towards the target) to throw the ball
- ’Feet Wide to Catch’- the wider the feet, the closer the hands and butt are to the ground.
- Get in front of the ball to catch the ball’ - don’t get in front of the ball until the last step before fielding the ball. When a player gets in front of the ball too soon, the feet stop moving. Stay to the side of the ball when approaching the ball. Step in front of the ball to catch to catch the ball.
Major League Shortstops - Fielding Footwork (VIDEO)
The first 1:30 is a Series of short clips (1-2 seconds each), at regular speed, illustrating the ‘Fast-Slow-Fast’ footwork rhythm of the ground ball fielding action.
- First Clip - watch for ‘Move Feet to Throw’ resulting in the player ‘Gaining Ground’ towards their target.
- Second Clip - watch the player get their ‘Feet Wide to Catch’. They ‘Step in Front of the Ball to Field the Ball’
- 0:18-0:24 - Four clips in a row where the ‘Fast-Slow-Fast’ Rhythm of the Feet is quite clear to see.
A. Fast - note the quick choppy steps preparing to catch the ball
B. Slow - players actions throttle down to make the ‘Wide Feet to Catch’ action ...under control
C. Fast - player ‘shuffling’ feet towards the target, generating power for the throw
The second half of the video (1:30 - 3:20) shows the fielding action is slow motion.
Reading Hops (older kids / more experienced players)
…note which part of the hop fielders catch the ball in the video above
- Short hop (ball hitting the ground just in front of the glove)
- Top of hop
- Downside of hop (not ideal, but sometimes it’s the best a fielder can do)
Ranging Laterally


Replaying The Ball


Throwing Across
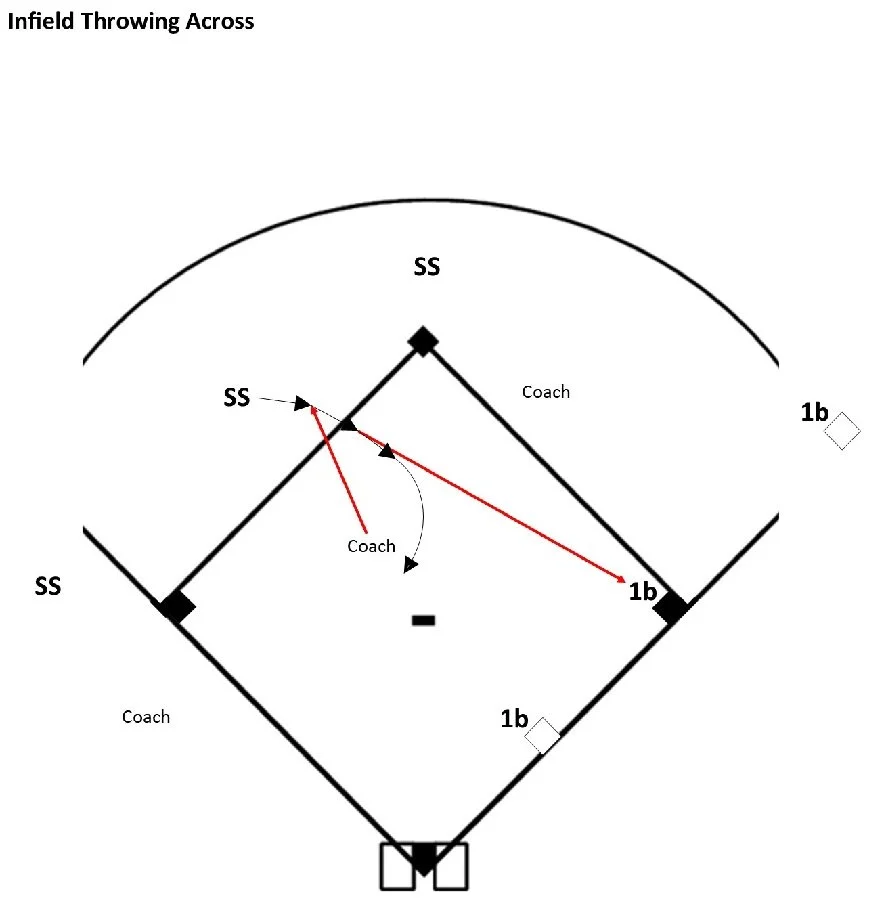
Objective
Mass reps of the process of fielding (footwork) and throwing across the diamond
Actions
Fielding: Fast, Slow, Fast footwork rhythm
Throwing: Make a quick, powerful shuffle straight towards first base (Move Feet to Throw)
- The effort in the throwing action is ‘Fast’ with the arm; ‘Faster’ with the wrist ...an accelerated action: arm-wrist.
- Allow the momentum of the body to continue straight towards first base, for a couple of steps, after making the throw.
- The effort with the legs and the momentum after making the throw are critical points for making an accurate throw.
- It is the responsibility of the coaches to constantly remind the players to ‘Move Your Feet’ and ‘Continue Momentum Straight Towards the Target’ after making a throw.
- If available, put an extra coach in foul territory on the first base side. This coach, with great emphasis, motions to the Shortstops to continue their momentum towards the target after making a throw. Remember, young kids think throwing is exclusively an arm action; we need to train them to maximize the power in their legs.
- Note: this needs to be a nimble coach who can bounce up and down the line communicating with Shortstops in all three groups.
Drill Set-up
Throw Down Bases (or anything to represent a base):
- Midway between home plate and the actual first base
- 30’ beyond the actual first base
Cones/Markers indicating where each Shortstop needs to be prior to their coach rolling the ball
Shortstops (three groups)
- In foul ground on the third base side
- Actual SS position
- 5’-10’ on the right field side of second base
Coaches (3)
- 20’ from each Shortstop
First Basemen (3)
- In a Ready Position at their base; eyes on the coach and Shortstop. Be prepared to receive throws in rapid-fire fashion
Drill
FIRST: alert all players that this is a fast-moving drill. First Basemen will have balls coming at them every 7-8 seconds. Shortstops waiting need to pay attention and get in a Ready Position at the cone/marker the moment the player ahead of them moves to field the ball. The Shortstop who just fielded the ball and made a throw needs to immediately get out of the way of the next throw.
Coaches
- First, make sure each group of Shortstops are clear on which First Baseman they are throwing to, and that each First Baseman knows which group of Shortstops is throwing to them
- Roll balls to their group of Shortstops, same as the 20’ Ground Ball Drill
- We want a ball fielded and thrown every 7-8 seconds
- Note: watch the throws to First Base; be sure the First Baseman will be ready when the ball is rolled to the next Shortstop. ***Likely the First Baseman will need to be reminded to not worry about touching the base; and be reminded to get ready for the next throw.
First Basemen
- Set up in a Ready Position, Moves Feet to Catch (Ball First, Base Second), Reaches Forward to Catch. If the ball is offline, Do Not be concerned with touching the base, just catch the ball. If the ball is uncatchable, let it go …DO NOT chase the ball.
- Balls that are caught are rolled back to the coach running their group. Quickly set up at the base; the next ball will be coming in 7-8 seconds.
- Note: the first time running this drill consider having adults taking throws. Initially kids playing First Base likely will not be focused enough to get rid of the ball they just caught and be alert for the next throw. Also, they may be fighting the urge to have their foot on the base when catching throws. This is not a First Base footwork drill. The role of the First Baseman is to give the Shortstops a target to throw to. The First Baseman get a lot of reps catching throws (which is good). They also get experience executing the ‘Ball First, Base Second’ concept.
Shortstops
- Field and Throw, per points noted above in ‘Actions’. After completing a couple steps of momentum towards their target after they throw, circle around behind the coach, getting out of the path of the next player’s throw. Quickly get back to their position; they will be fielding a ball every 15-20 seconds.
Infield
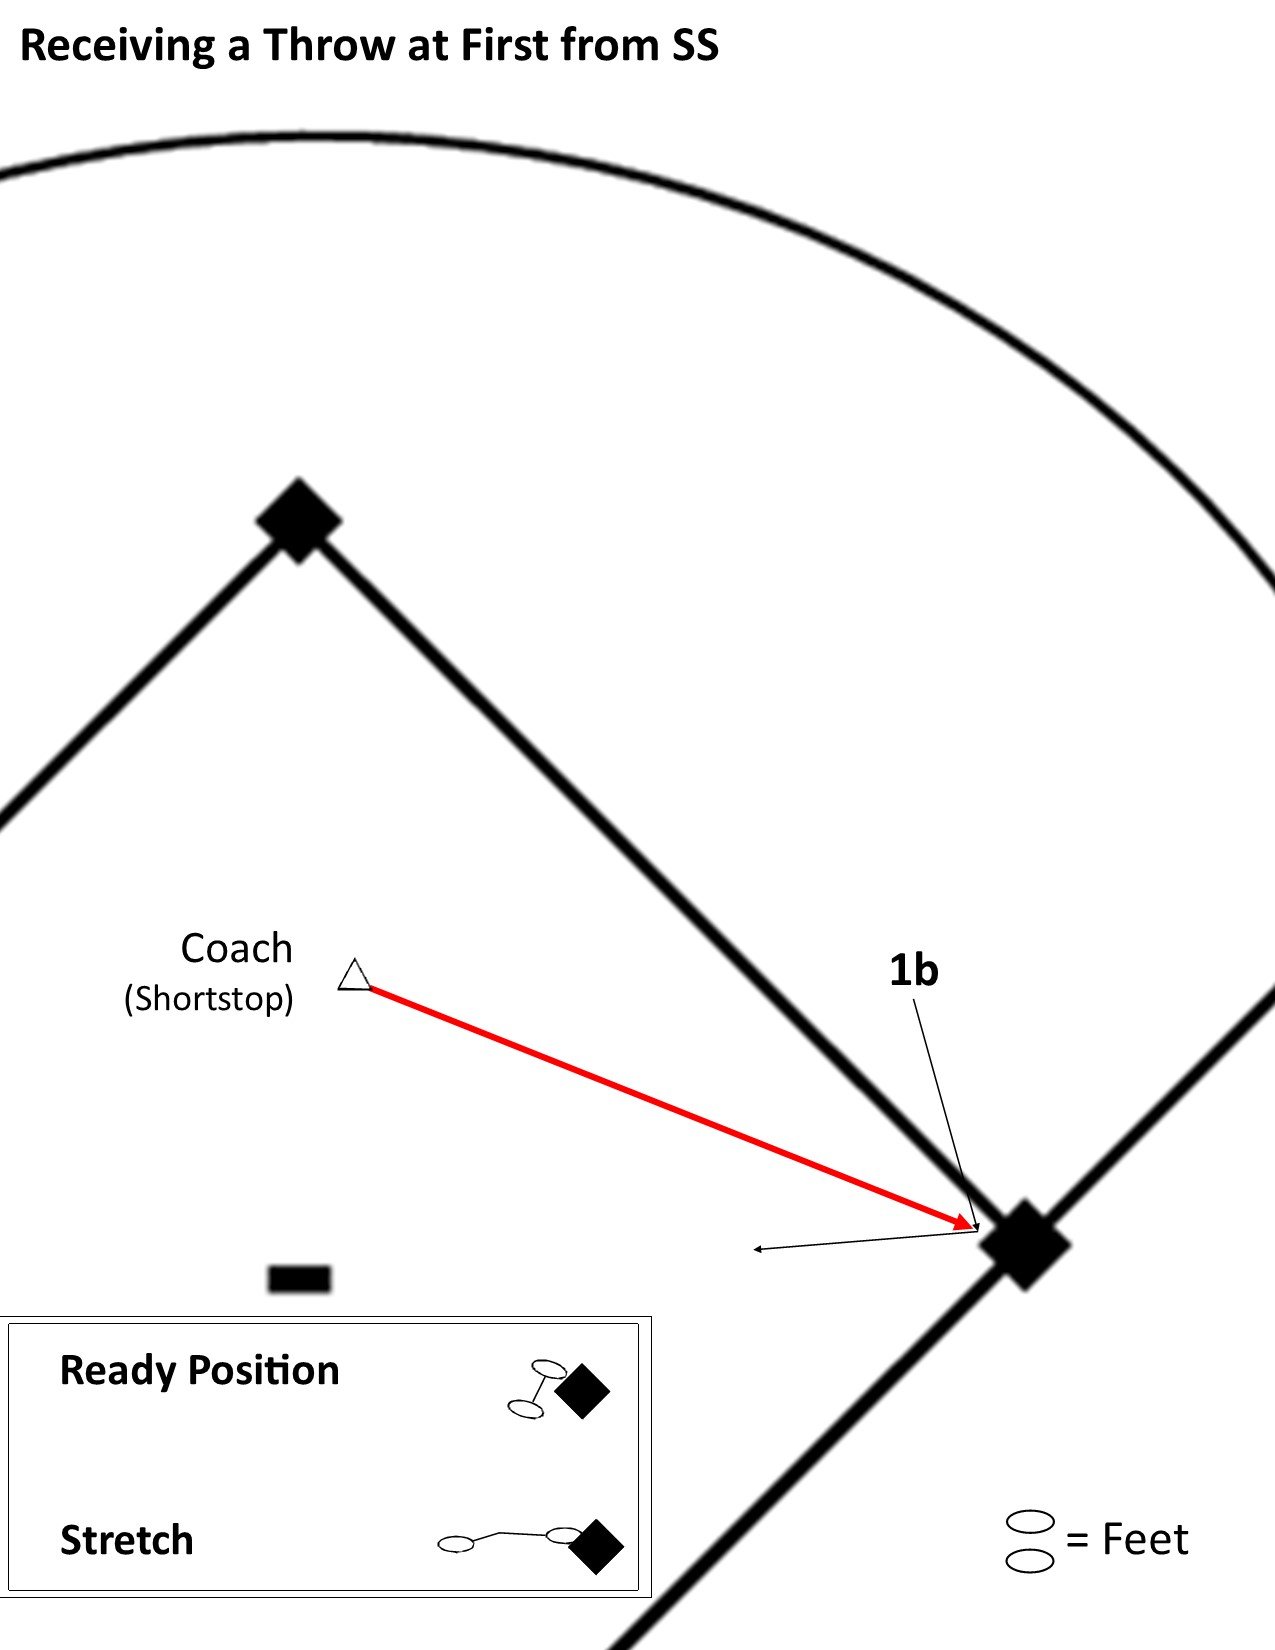
Receiving a Throw at First Base (Force)

Receiving a Throw at Second Base (Force)
Receiving a Throw at Third Base (Tag)


Three Groups Drills: 6-1, 1-6, 4-3


Three Groups Drills: 6-5, 4-6, 3-4


Three Groups Drills: Rec Throw at Third, INF Base Coverage, 20' Gb's

Outfield
Backing-up Plays
Go Get (Balls in Front)
The Defensive Responsibilities section > The System (Part 1) establishes that the first responsibility (mindset) of a fielder is to Go Get the ball. The first step a player makes when the ball is hit, is Towards the Ball.
In the case of the Right Fielder (RF) or Left Fielder (LF), any ball hit in the infield on their half of the field, their first responsibility is to sprint towards the ball.
When the ball is hit to the infield, on their side of the field, RF/LF always anticipate that the ball will not be fielded by another player. While sprinting towards the ball, if they see the Ball fielded by an infielder, only then do they alter their movement to get into position to Back-up.
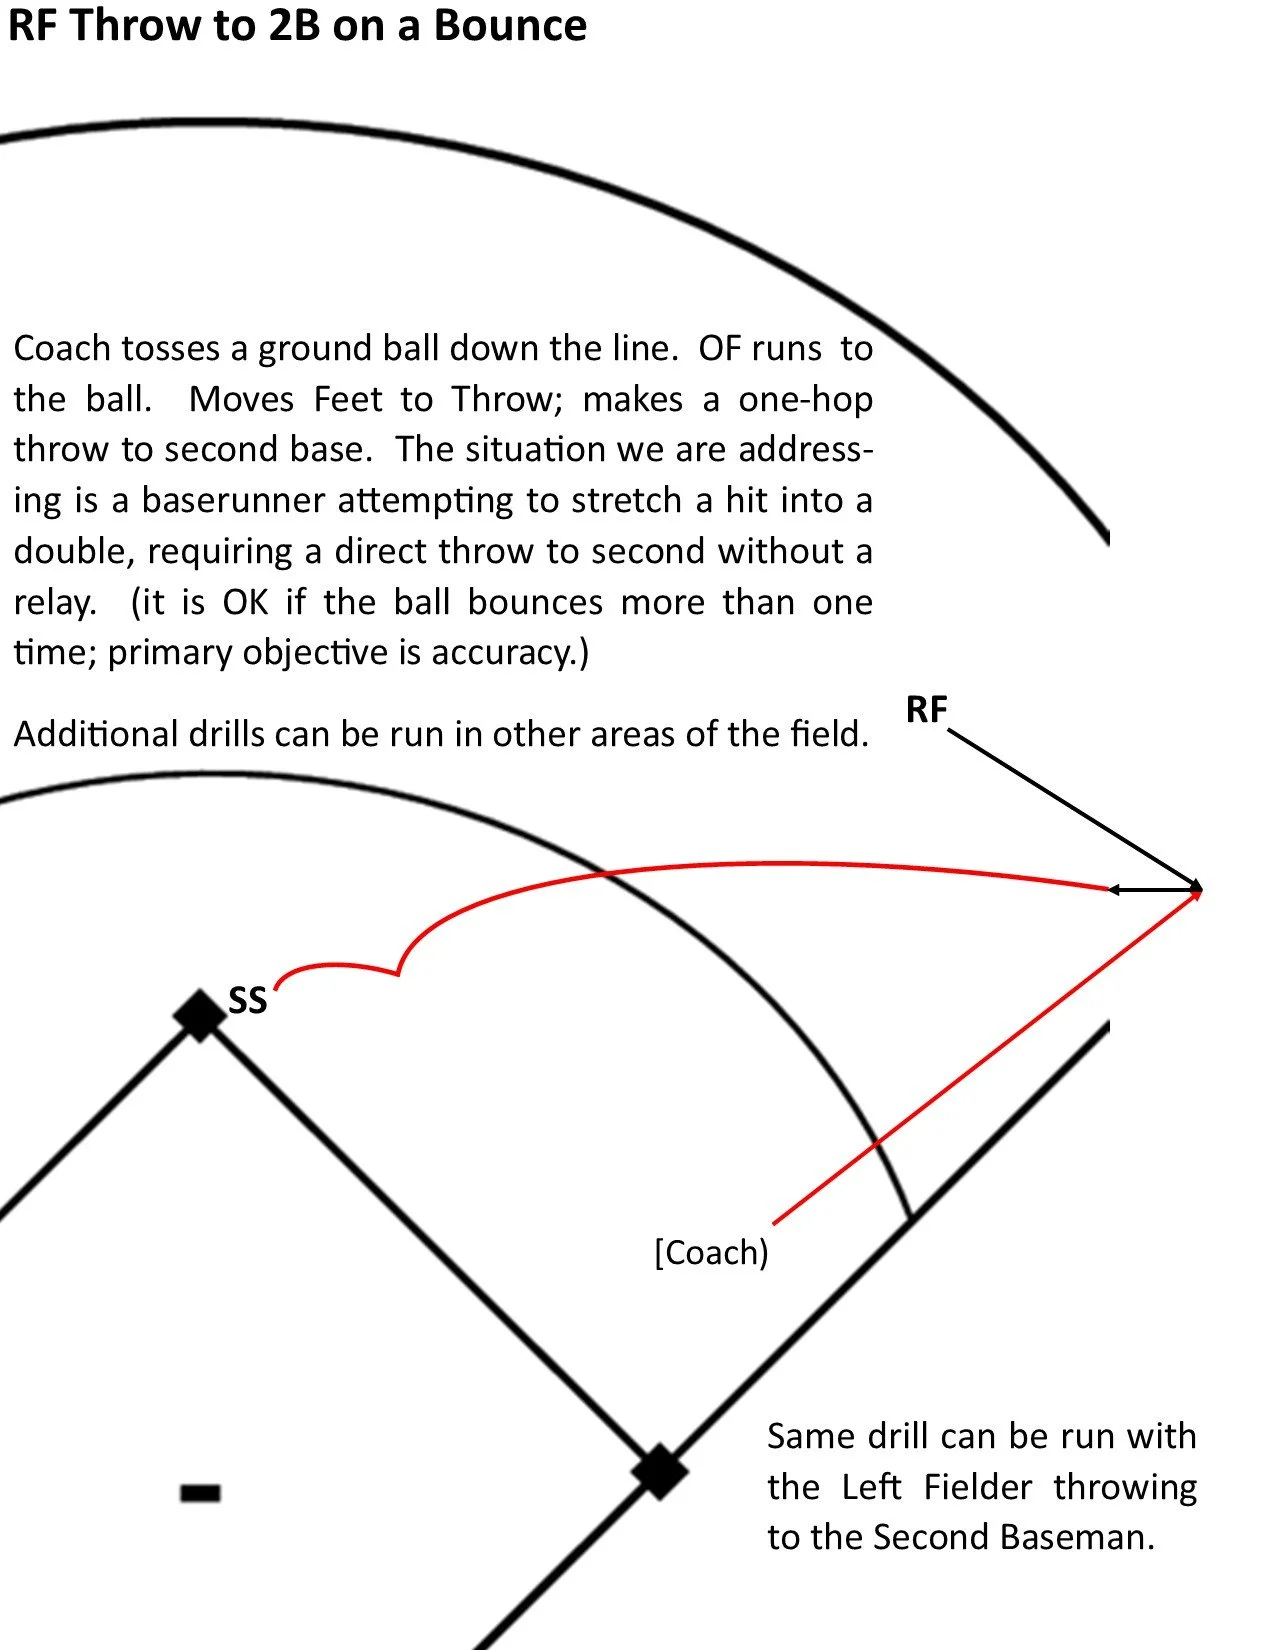
Ground Balls – Hit Cut (‘Box’ Mentality)


One Hop to 2B - Ball Down the Line
Playing Catch Practice
Description - Playing Catch Practice
Playing catch properly is the foundation of the game. This is the most important part of the day. Often it is reduced to lazy, screwing around time; we want to change the culture of this part of practice, immediately, Day 1.
Legendary, Hall of Fame Player, Cal Ripken Jr. is quoted as saying, “I can go to a kids game, watch the two teams play catch, and tell you who is going to win”.
The routine below is not simply, “Go Down the Right Field Line and Play Catch”.
This is a 15-20 minute Routine that covers:
- Batting Skills
- Throwing & Pitching Skills
- The Skill of correctly receiving a thrown ball
- Skills commonly used in games, but rarely, if ever, practiced
‘Playing Catch Practice’ replaces the traditional ‘warm-up’ with an activity that we elevate to ‘Drill’ status. Instead of sending the kids out to toss the ball back and forth to get loose before practice we organize a structured activity that has specific points of focus throughout.
The activity has four parts (5 minutes each; coach may choose to vary the times. Parts 1, 2 & 4 can often be completed in less than 5 minutes):
Part 1 ‘No Bat’ & ‘No Ball’ Drills 5 minutes
Part 2 Pitching Practice 5 minutes
Part 3 Position Player Throwing and Receiving 5 minutes
Part 4 Common Skills needing constant attention 5 minutes
This ‘Drill’ requires strict policing by the Head Coach (this is the most important activity of the day), making sure the kids are executing their actions correctly.
Enforcement involves stopping the drill, reminding the players of the focus point(s) of the activity and then re-starting the drill. In the first few practices of the year this can occur 5-6+ times (most of the stopping and starting is during ‘Position Player Throwing and Receiving’).
Assistance from the other coaches and any adults that are hanging around the practice field is critical.
Their role is to get a new ball into the hands of any kid who misses a throw, so that player (and their partner) can immediately continue working on their skill development. – Chasing overthrown balls eats up a large chuck of baseball and softball practices. We want our kids, in every activity during practice to spend their time building skills, not chasing after missed throws.
Part 1 - ‘No Bat’ & ‘No Ball’ Drills
SET UP:
Kids find a throwing partner and set up in two rows of six; one throwing partner in the front row, one in the back, behind their partner.
DRILL:
Batting ‘No Bat’ Drills, followed by Pitching/Throwing ‘No Ball’ Drills
Part 1B - Move Feet to Catch
(Only run on Days 1-3) [possibly plug in, from time to time, during the season for review and to solidify habits]
Prior to the players breaking out to Play Catch (Pitching Practice, followed by Position Player Throwing) have them Move Their Feet to Catch a couple times in each direction (takes 30 seconds)
Remind players that when a ball is thrown to them, when playing catch or in a game, rarely does it come straight to their chest. The ball is usually to one side or the other.
We do not want players reaching out to their side in the hope they catch an offline throw. We want them to ‘Catch the Ball with Their Feet’; we want them to ‘Move Their Feet to Catch’.
The process/drill has three parts:
- Ready Position: Feet Wide, Knees Bent, Hand and Elbows in front of the torso; an ‘Athletic Position’ much like a linebacker in football or a basketball player defending against an opponent dribbling the ball up court.
- Move Feet: in our drill activity, the players cross over 1-2 two steps moving approximately to the side.’
- Reach Forward to Catch: after Moving Feet, the players square up their shoulders (back in a Ready Position) and put extra emphasis on Reaching their Hands out, simulating a good position to catch a thrown ball.
When doing this as a drill, have the entire group Move Their Feet to Catch in one direction. Then when everyone is set-up again in a Ready Position, have them move back the other direction. Do this in each direction 2-3 times; takes 30 seconds…but develops an incredibly valuable habit.
Note: during the drill, the rows will break down a bit. Don’t try to get the rows back in order. Run the drill, back and forth; finish the drill, then straighten the player rows. (The younger the kids, the more the rows get discombobulated.)
Ready Position

Move Feet to Catch

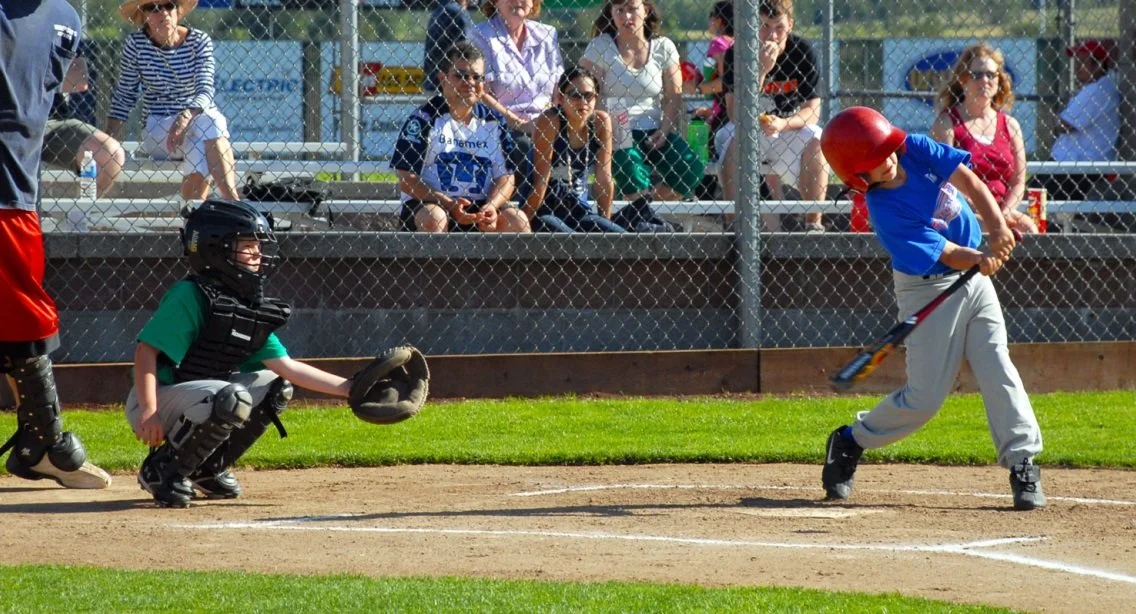
This throw is arriving a few feet wide of the base. The Third Baseman isn’t reaching sideways to catch the ball. He has Moved His Feet (taking his hands to the ball) to a point where he can Reach forward to Catch.
Yes, the runner is safe on this play (Runners are Safe A Lot!), but the Third Baseman stopped the ball. The runner has to stay at the base; cannot advance because there is not an ‘overthrow’.
Reach Forward to Catch

Part 2 - Pitching Practice
DO NOT give kids a ball until they are set-up properly and all are ready to start. Its amazing how fast they get lined up to throw when they don’t have a ball.
(Suggested Rule: players are Never allowed to reach into a ball bucket unless instructed by a coach. When the coaches are in control of the balls, players quickly become exceptional at following directions.)
SET UP:
Players 30’-35’ from their partner.
Head coach is positioned at one end of the rows of players, midway between the two rows; watches them like a hawk.
Extra coaches and adults spread out approximately 30’ behind the two rows of kids; each with 2-3 extra balls. The kids will not catch every throw. The role of the extra adults is to get a new ball into the hands of any kid who misses a throw, so that player (and their partner) can immediately continue working on their skill development. – Chasing overthrown balls, it can be argued, eats up more skill building time during a practice than any other factor.
Roll the balls to the kids. If we throw the ball, half the time it doesn’t get caught…leading to more missed skill building time.
DRILL:
Play catch focusing on a single aspect of the pitching delivery, per the direction of the coach. Midway through, the coach stops the throwing and switches to a new point of focus.
Note 1: Yes! We have all players work on pitching skills each day. Two reasons: (1) We want to develop pitching depth, (2) if a less skilled kid ever asks to pitch in a game, we can fall back on the question, “have you been totally focused during pitching practice each day?’. We are not sidestepping the question; we are asking them a legitimate question in return. Often kids ‘want’ to do something, but don’t always ‘do the work’ to achieve that Want’. Its a good teaching moment.
Note 2: Make it clear to the kids that they are not throwing hard like a game; just natural speed. The receiving player does not squat down (they will want to, but it quickly turns into screwing around time, not skill development time). The kids are simply playing catch, but with their focus on the pitching motion.
Note 3: It is recommended that softball players only use a modified action of just bringing the pitching arm back, focusing on the finishing segment of the delivery, rather than a complete pitching action. A good percentage of youth softball pitchers can stand to improve their finishing action and release.
Part 3 - Position Player Throwing and Receiving
“Move Your Feet to Catch, Move Your Feet to Throw”
SET UP:
Players move back to full throwing distance (65’ for 11-12 year-old level; 60’ for 9-11 year-old level; 50’ for ‘First Year Player Pitch level).
DRILL:
This activity is the bedrock of the drill. When a player is throwing from a defensive position in practice or a game they (should) move their feet towards their target so the legs can power the throwing action. The reality of positional throwing at the youth level is that kids generally resort to ‘pitching’ the ball across the field – they limit their footwork to ‘step and throw’
Proper throwing technique as a position player is preceded by a skip, shuffle or crow hop movement of the feet – position players “Move their feet to throw”. In this part of the Playing Catch Practice drill the players are required to “Move their feet to throw” on every throw. We need to make it clear to them that their footwork, moving their feet is the focus of the drill. The fact that they are throwing the ball is not the primary focus.
In addition to “Moving their feet to throw” we need to teach the players that after they release the ball they want to allow their momentum to carry their them forward a step or two ‘in a straight line towards their target’; they “Follow their head”. - This is where the oversight from the coach comes into play. It will take 3-4 practices for all our kids to get in tune with the concept that the movement of the feet is the key to throwing success. (The habit and discipline to “Move their feet to throw” on every throw, every day, all year requires constant oversight from the coaching staff.) When we see the kids not executing this action it is time to stop the activity and remind them that the single purpose of their throwing actions it “Moving their feet to throw”.
The players receiving the throws also have specific focus points relating to moving their feet. We know (and the kids know) that most throws do not go exactly to the spot the receiving player is standing. In most cases, for the receiving player to have the best chance to catch a throw, they need to ‘move their feet to take their hands to the ball’. The three requirements (on every throw) of the receiving player are:
1. “Ready Position”* (prior to every throw)
2. “Move Your Feet to Catch”
3. “Reach Forward to Catch”
*Ready Position: Same stance as a basketball player playing defense – feet wider than the shoulders; hands reaching out in front of the body. The receiving player needs to be ready to immediately move, the moment the balls leaves the throwing player’s hand, in order to ‘beat the ball to the spot’ where it will be caught.
RULE: The throwing player IS NOT ALLOWED to throw the ball until their partner is in a “Ready Position”. - Simply stating this rule will not result in the kids following it; this needs to be policed and enforced throughout the season. This is not just a good rule for discipline and solid technique, it also increases safety during the activity. If the receiving player is always ready and focused prior to every throw coming to them we will reduce, significantly, the occurrences of players being injured by thrown balls.
Part 4 - Skills Segment
This drill is run immediately following Full Distance catch (65’ for 11-12 year-old level; 60’ for 9-11 year-old level; 50’ for ‘First Year Player Pitch level).
Playing Catch partners move closer together so they are 30’ apart.
Once the players are set-up correctly, set their hats on the ground next to their feet (so they can quickly find their way back to their starting point).
Each player needs their own ball.
DRILL
We have three different drills for this segment. We run only one per day. Day to day we rotate from one drill to the next.
This is run for a few repetitions at the end of Playing Catch Practice. Once the kids become familiar with this aspect of the Playing Catch Practice routine, we can get through Part 4 in about 3 minutes.
A key ingredient of these three drills is reinforcing ‘Moving Feet’ by applying it to an activity related to a specific game action.
- Replaying the Ball
- Relay Footwork
- Catch, Tag, Power Position (CTPP) - "Look for Other Runners"
- Pitcher Footwork: 1-6 Play (get the Lead Runner)
Replaying the Ball


Relay Footwork

Catch, Tag, Power Position (CTPP)


Pitcher Footwork: 1-6 Play

Relays
[The ‘Relay’ player can also be referred to as the ‘Cut-Relay’ player. That player doesn’t always Relay the ball. Sometimes they ‘Cut’ the ball and redirect the ball to a different base, or Cut the throw and hold the ball (when runners are no longer attempting to advance, or are clearly going to make it safely to the next base.]
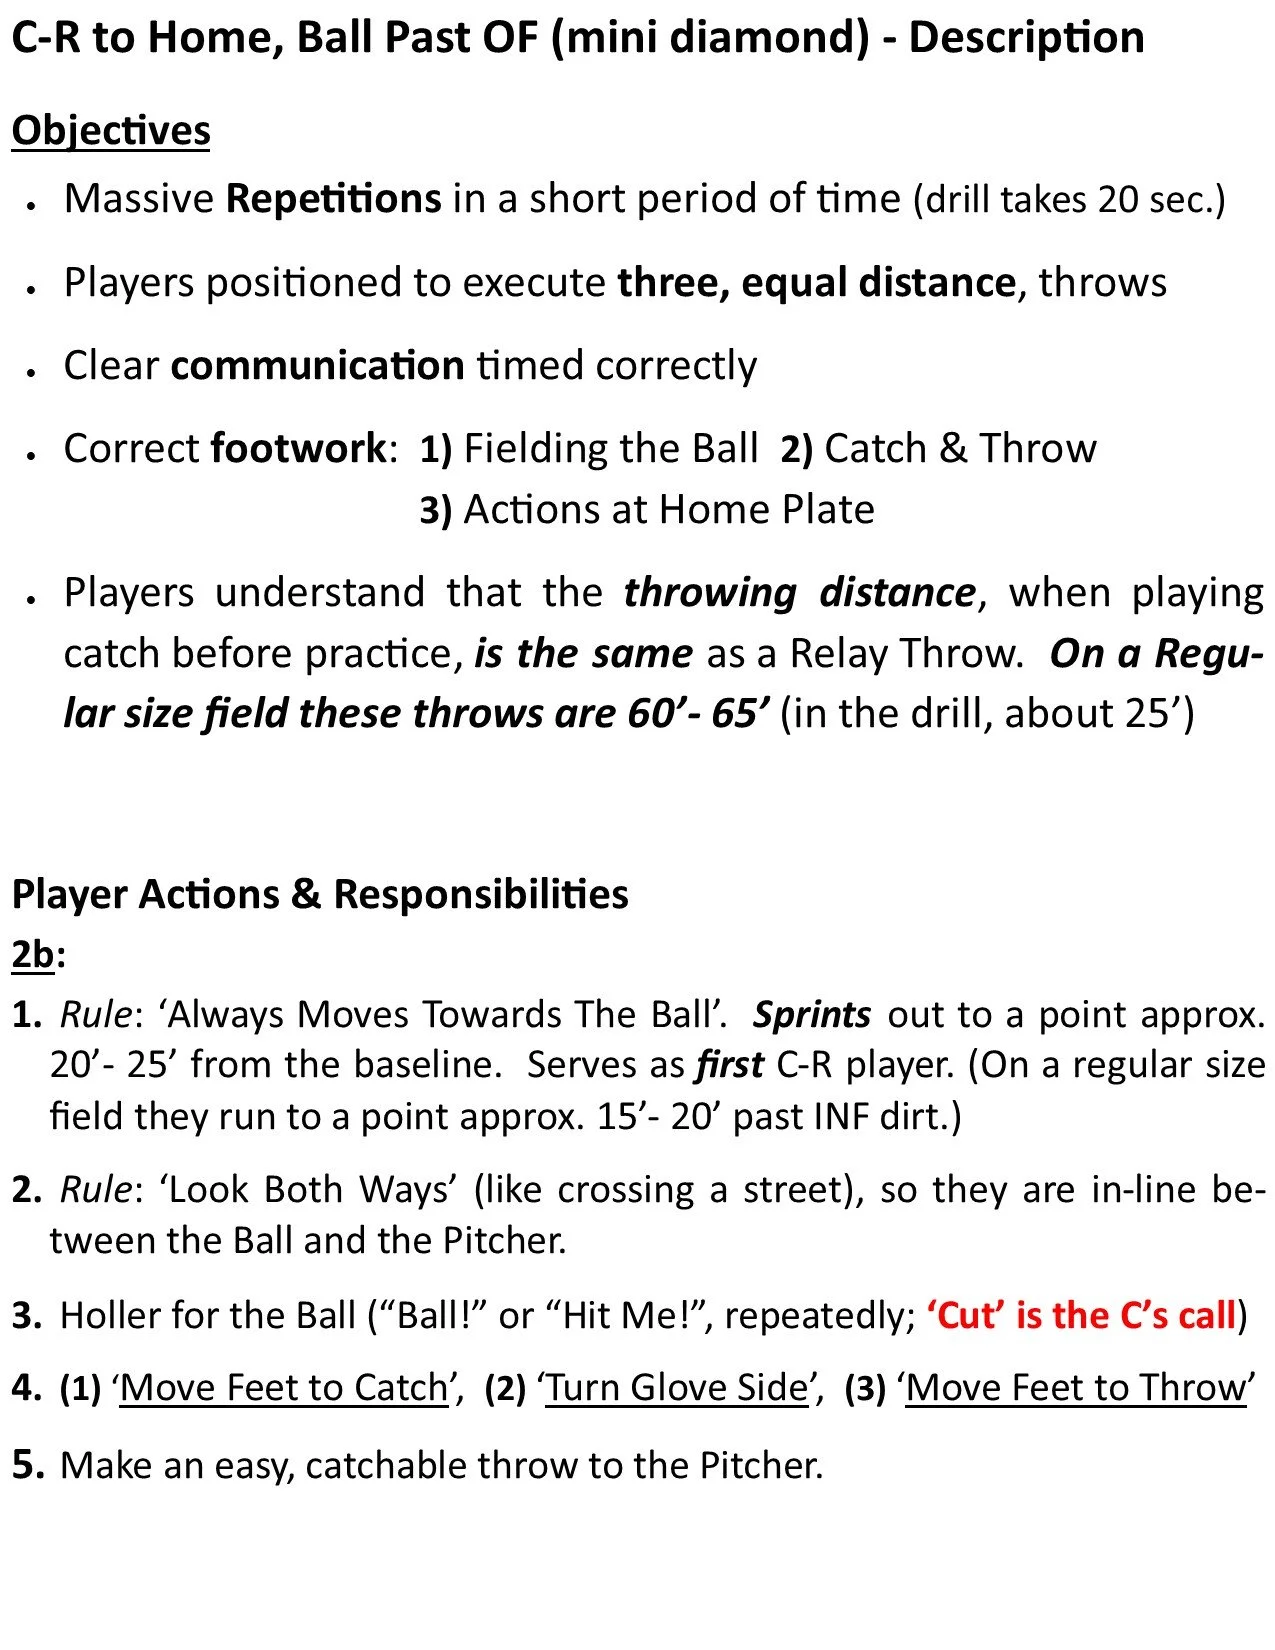
Cut-Relay to Home (Ball Past OF)


Cut-Relay to Home ("Eat It, Run It in")


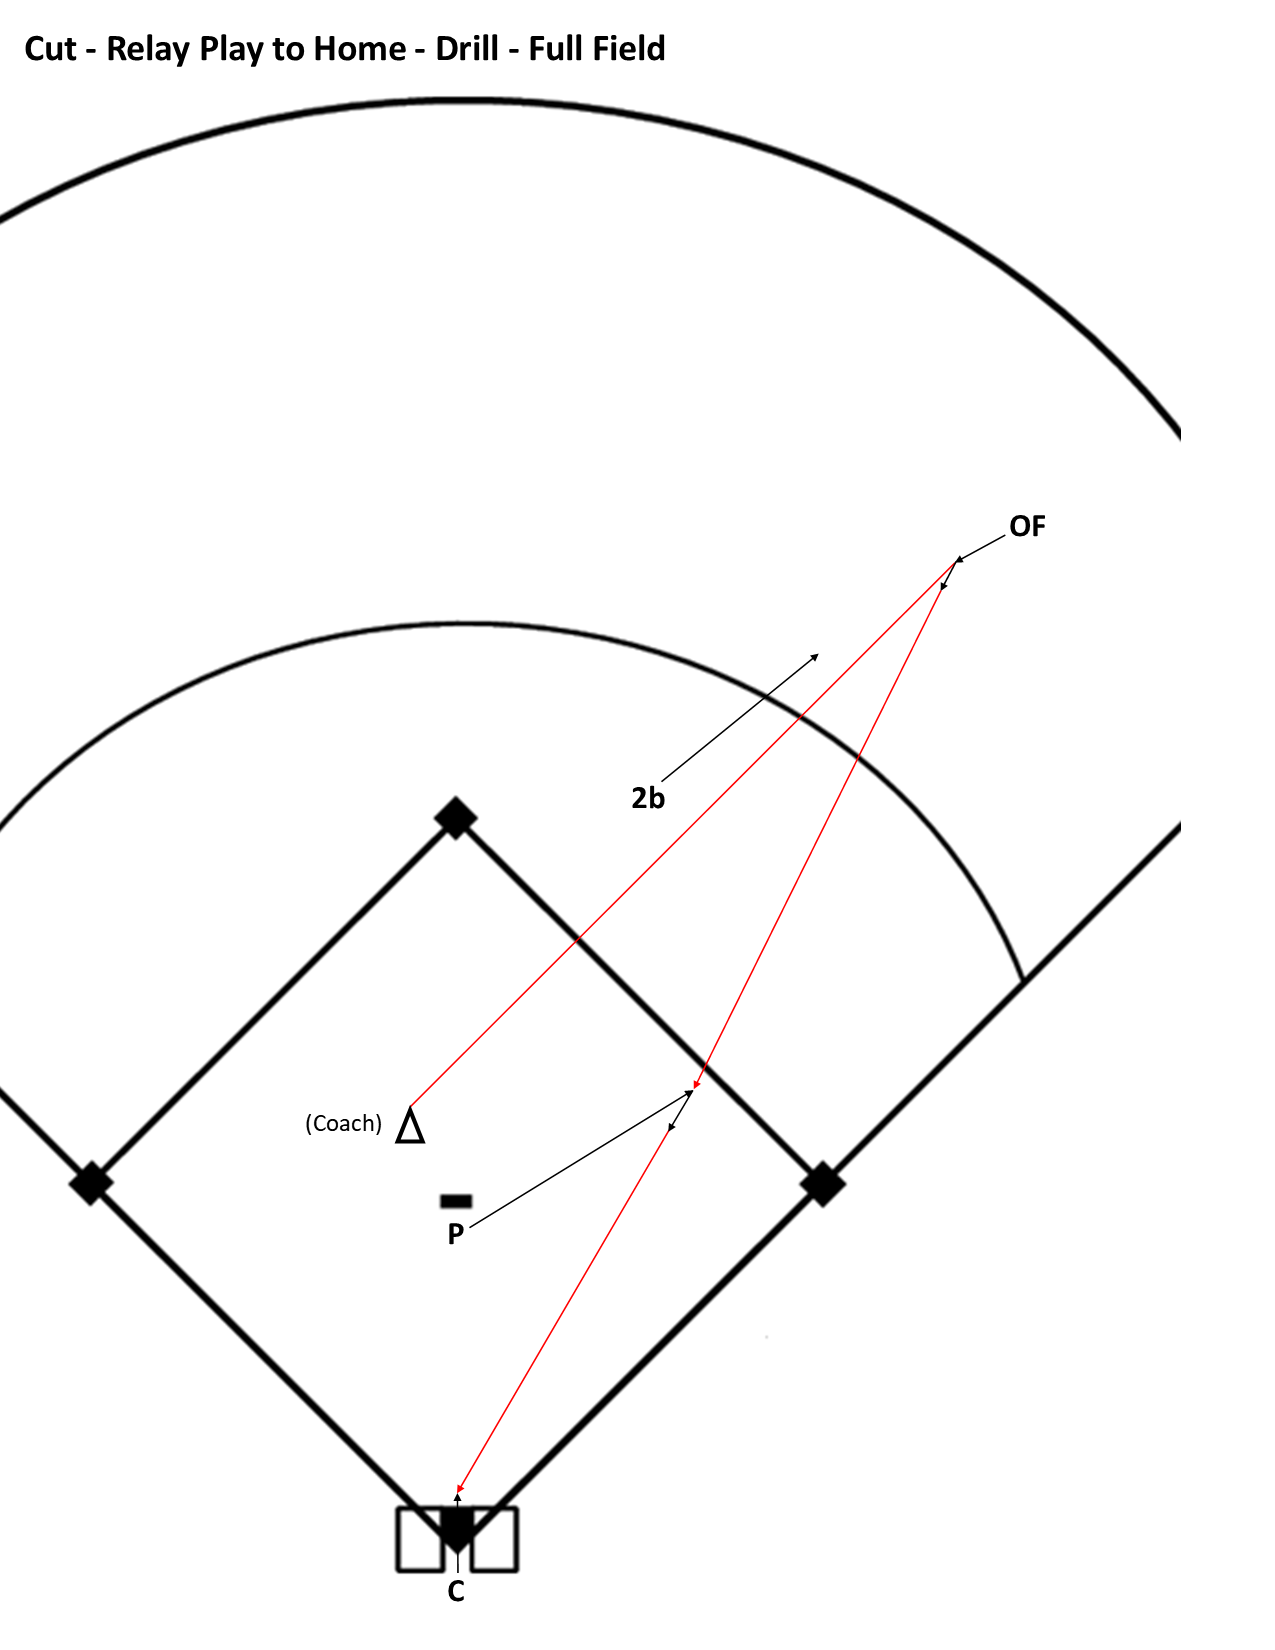
Cut-relay to Home (Full Field)
DRILL
Coach
- Mix up the location of balls to the outfield, so pitcher’s learn to line up to different spots.
- Maintain discipline of the Pitcher and Catcher on their movement and communication responsibilities
Middle Infielder (Second Baseman in this diagram)
- Rule: ‘Always Move Towards the Ball’. The Middle Infielder runs out towards the ball hit into the outfield.
Pitcher
- Get lined up - Look both ways. Find the ball, look home, get on the line between the ball and home plate
- Move out toward the outfielder to a point near the baseline between first and second. Do Not go past the baseline
- Call loudly and repeatedly for the ball, in a Ready Position, facing the ball
- Catch & Throw - ‘Move feet to catch’, ‘Turn glove side’, move feet, towards catcher, to throw
Outfielder
- Field the ball using the same rhythm as fielding a ground ball in the infield: Fast, Slow, Fast
- Maintain a ‘Box Mentality’; throw the ball to the Pitcher (Cut-Relay Player)
- After throwing the ball, move to back up a base. Be alert for a throw to a base by the pitcher or catcher
Catcher
- Move to the catcher’s ‘position’, in front of home plate
- Call the play: just before the outfielder fields the ball, call loudly, “Four, Four, Four”
- Communicate to Pitcher (Cut-Relay Player), while the ball is in the air between the outfielder and pitcher call and repeat loudly, “Cut Four, Cut Four”
- Move Feet to Catch, tag the ground in front of home plate where the base runner would be sliding, then shuffle out towards the middle of the infield, ‘Look for other runners’.
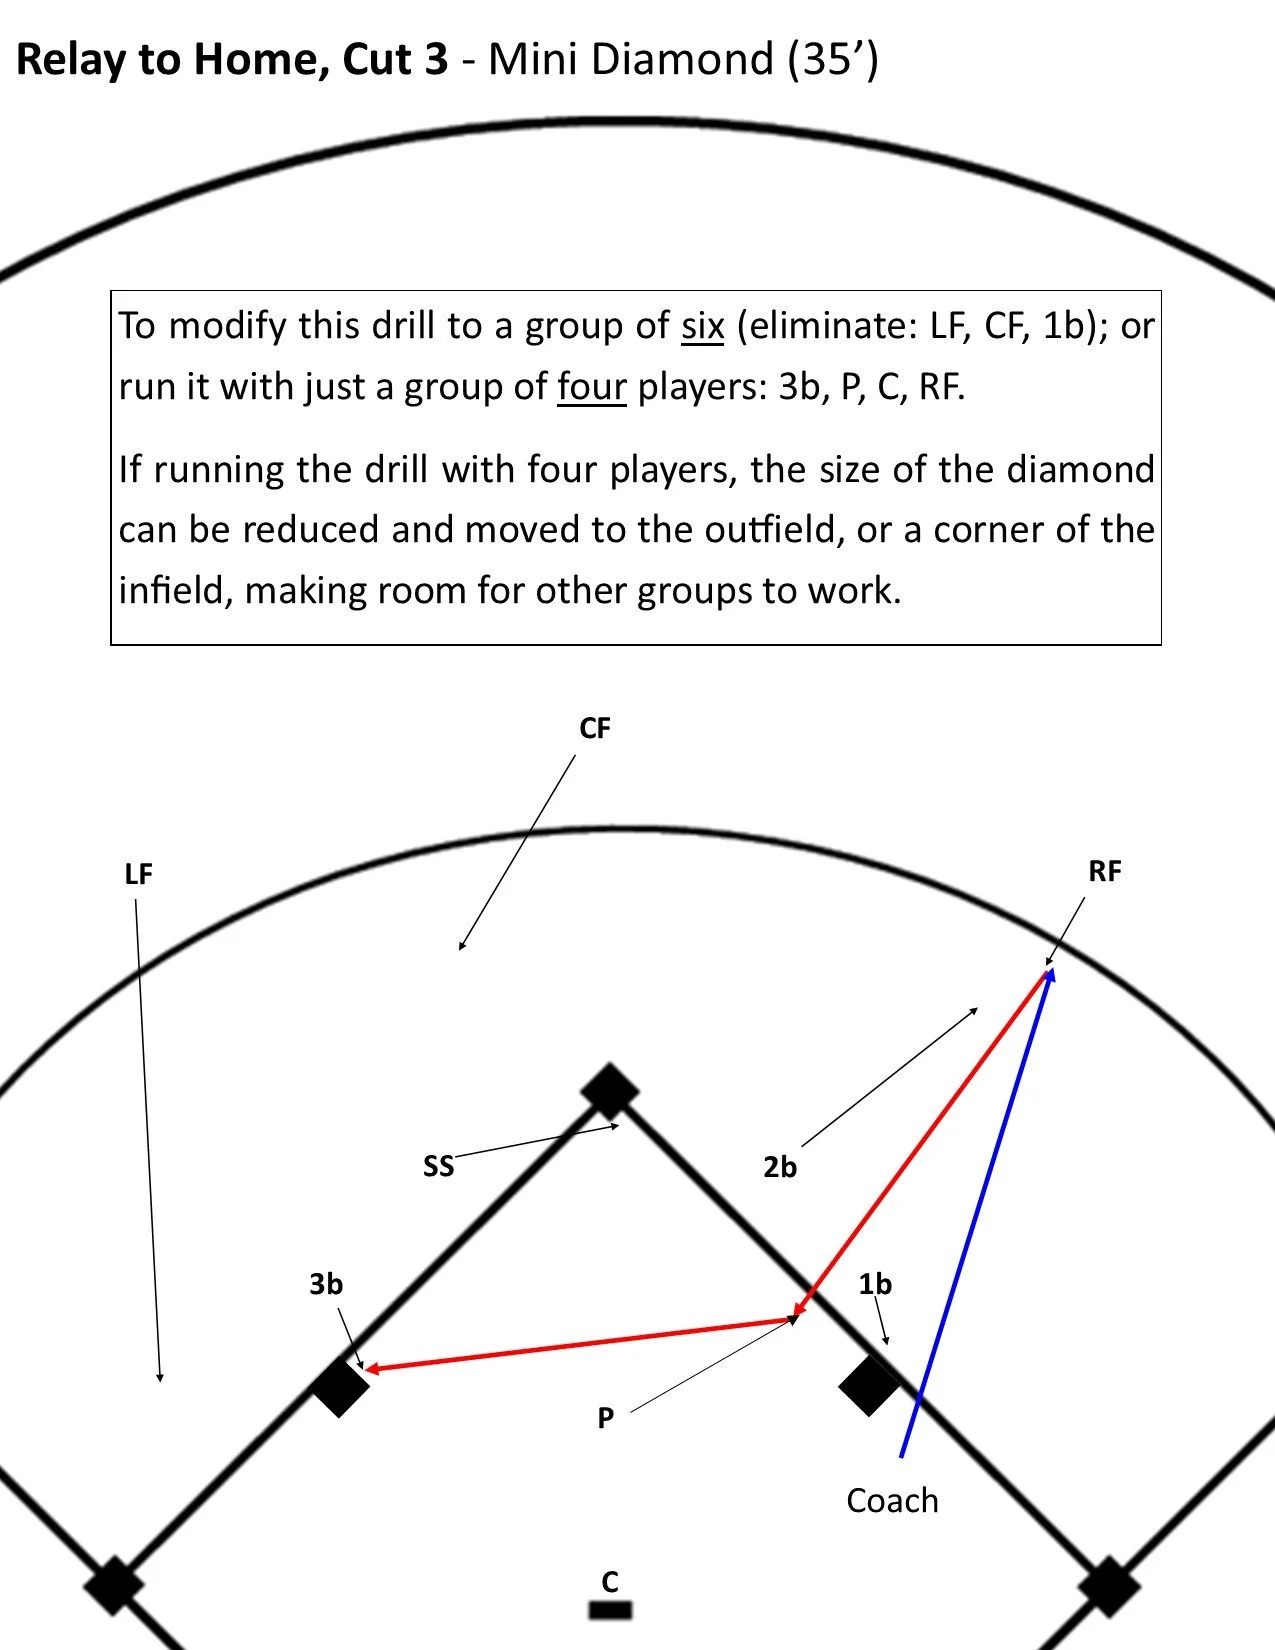
Cut-Relay to Home (Mini Diamond)


Cut-Relay to Home - Cut 3, 2


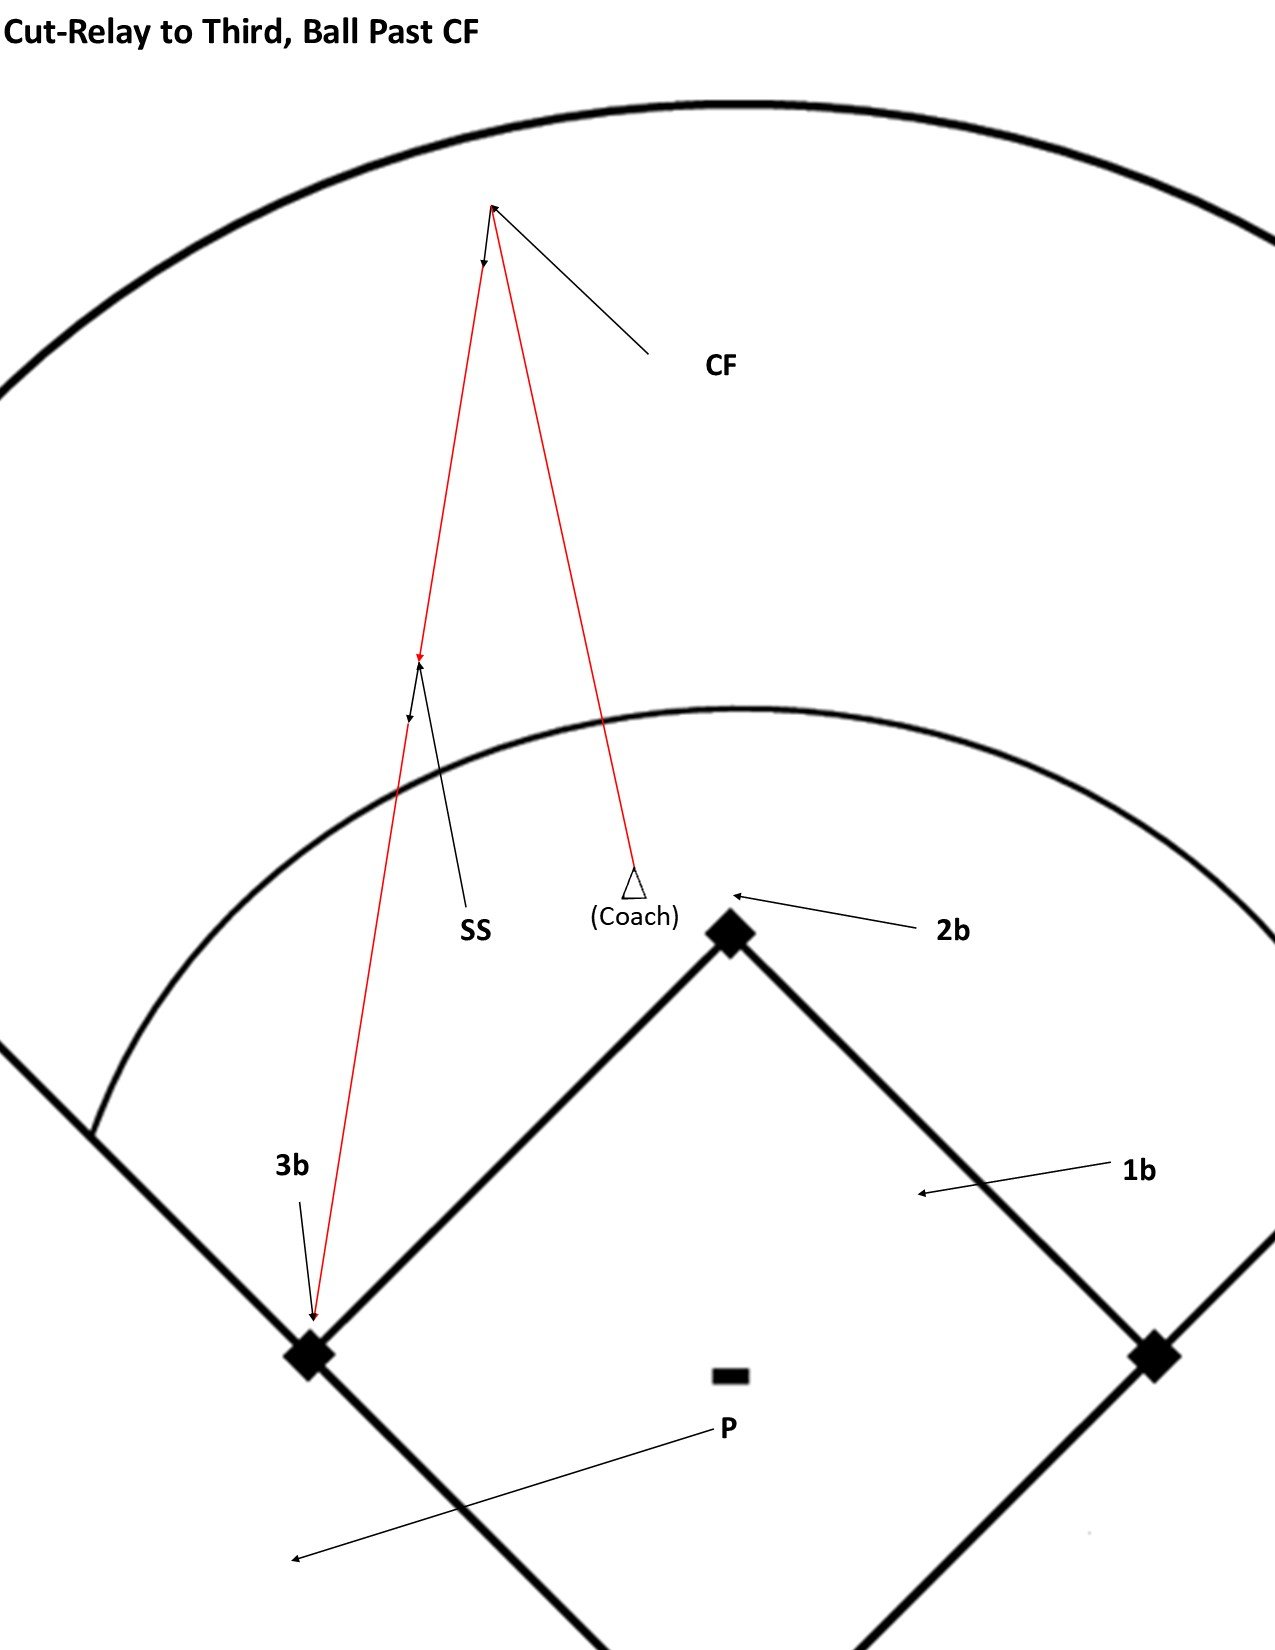
Cut-Relay to Third
This play should be practiced on the Mini Diamond first. Given practice time limitations during the season, we may not have time to practice the play on the Full Field. The important things the players are learning: movement/positioning and communication. These can be trained on the Mini Diamond. The only skill not addressed in the Mini Diamond scenario is throwing full distance (~55’-65’), which the players work on each day during Playing Catch Practice.
Coach
Toss the ball to a point beyond the Center Fielder.
Center Fielder
‘Box’ Mentality. Get to the Ball quickly. Responsibility is limited to making a good throw to the Shortstop (do not be concerned with the runner(s); that is the responsibility of the Shortstop and Catcher).
Catcher
Get into position to cover ‘Fourth Base’. Wait until the Center Fielder is about to pick up the ball. Assess the situation, call out which base the play is going to; the options are: Third Base or Second Base.
As the ball is in the air to the Shortstop, another call is made. The likely options are:
- ‘Eat it, Run it In’
- ‘Cut Three’
- ‘Cut Four’ (Home Plate)
Shortstop
Moves to a point midway between the Ball and third base. ‘Look both ways’, identifying the location of the ball and third base, then getting in line between those two points.
Second Baseman & Third Baseman
Cover a Base; standing on the same side of the base as the ball.
First Baseman
In this situation, the Batter-Runner is advancing to Second Base (which eliminates the possibility for a throw to First Base). They follow the ‘Ball, Base, Back-up’ rule: They are not getting the Ball, they are not needed to cover First Base, so they default to Backing-up a possible throw to Second Base.
Pitcher*
Back-up third base.
Note: if they hear a call for a throw to home, if possible, they move to a point between the Shortstop and Home Plate. In such case, they likely would not be asked to relay the ball to home plate. It is more likely they would serve as a ‘Cut’, meaning they would cut the ball and redirect it to another base, or ‘Cut and Hold the Ball’ (no play to get an out is possible).
* The complex situation of the runner, who is heading for Third Base, attempting to advance to Home, is pretty much limited to the 11–12-year-old levels of play. In most cases, at lower levels of play, the Pitcher’s responsibility is just backing up Third Base
Communication is critical on balls hit past the outfielders
The assumption on a ball hit past the outfielders is each runner will advance two bases safely. However, a slower runner could be vulnerable… a faster runner might be able to advance three bases.
The possibility of each circumstance is where communication is so important.
Communication starts with the Catcher. When the catcher makes a call for which base to throw to, the infielders ‘echo’ the call to the outfielder. After the infielders hear the Catcher’s call, they ‘relay’ the call to the outfielder.
When the ball is in the air to the Shortstop (assuming the original call was to throw to Third Base), the catcher makes a second call, either:
- “Three!, Three!”, meaning: Relay the ball to Third Base, we have a chance of getting an out at that base
- “Four!, Four!”, meaning: A runner we anticipated going only to Third Base is trying to score
- “Eat it, Run it In”, meaning: The runners will advance safely; we don’t want to make an unnecessary throw. Note: the Shortstop remains vigilant; when they turn to run the ball in, runner(s) may actually attempt to advance to the next base. The Shortstop needs to be ready to make a throw.
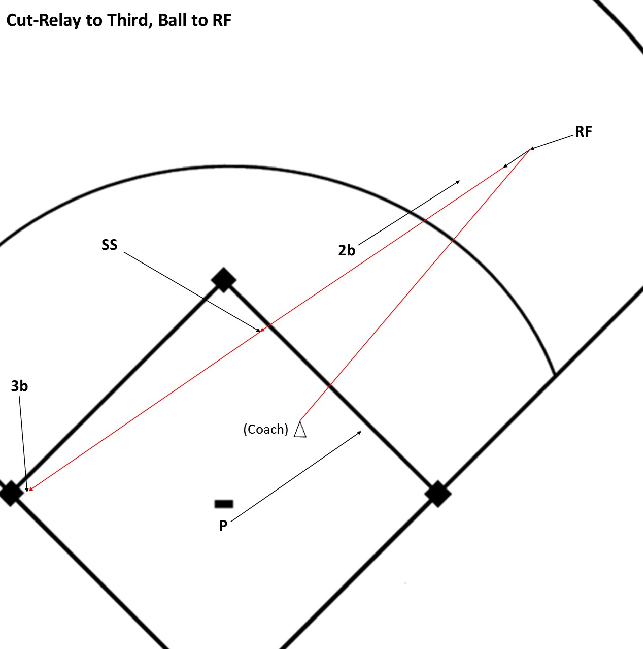
This play should be practiced on the Mini Diamond first. Given practice time limitations during the season, we may not have time to practice the play on the Full Field. The important things the players are learning: movement/positioning and communication. These can be trained on the Mini Diamond. The only skill not addressed in the Mini Diamond scenario is throwing full distance (~55’-65’), which the players work on each day during Playing Catch Practice.
Coach
Toss a ground ball to the Right Fielder.
Right Fielder
‘Box’ Mentality. Get to the Ball quickly. Responsibility is limited to making a good throw to the Shortstop (do not be concerned with the runner(s); that is the responsibility of the Shortstop and Catcher).
Catcher
Get into position to cover ‘Fourth Base’. Wait until the Right Fielder is about to pick up the ball to make the call, “Three!, Three!”, repeatedly. As the ball is in the air to the Shortstop, another call is made, ‘Cut Three’, repeatedly. (In a game situation, when the Catcher determines there is not a possibility of getting the runner out at third base, OR the runner stops at second base, an alternate call of, “Eat it! Run it In” is made.)
Shortstop
(We are assuming the SS identifies that the runner will arrive at second safely; there is no play to be made at second base.) Moves to a point inside the baseline, between the Ball and third base. ‘Look both ways’, identifying the location of the ball and third base, then getting in line between those two points.
Second Baseman
Follows the Rule: ‘Always run towards the Ball’. Run out towards the Right Fielder. In a game situation, if the runners have stopped attempting to advance, the Second Baseman gets the ball from the Right Fielder (ball is handed to the Second Baseman or delivered using an Underhand Toss from a short distance) and Runs the ball back towards the middle of the infield (while remaining alert of the base runners).
Third Baseman
Cover Third Base ‘With Their Eyes’; sets up in a Ready Position, on the same side of the base as the ball. After catching the ball and making a tag, they shuffle towards the middle of the infield, in a Power Position, ‘Looking for Other Runners’.
Pitcher*
Follows the Rule: ‘Always run towards the Ball’. Run out towards the Right Fielder, stopping inside the baseline. ‘Look Both Ways (at the ball and Home Plate), get lined up between the point the ball is fielded and Home Plate. (we are assuming there was a base runner on second base prior to the ball being hit. The Pitcher is now in position to serve as the Cut-Relay player to Home Plate.
In a game, if there is not a runner on second base, the Pitcher Backs-up First Base
Left Fielder (not shown in the diagram)
Back-up Third Base
Relay Footwork

Two Bases Relay (Competitive)

Skill Building Warm-Up
-
SBW Drills are designed to run prior to playing catch at the start of practice; none of the drills involve hard or long throws.
-
Ideal for practicing in a small space (when you don’t have access to a full field, are dealing with poor weather/field conditions, etc.). If not using BP’s practice plans, plug these into any part of your practice.
- This section’s drills correspond with content under the Practice Plans tab.
—-> SBW (2) - SBW (14) match up with with content in Majors/Minors Practice Plans #2 - #14
—-> SBW (22) - SBW (34) match up with First Year Player Pitch (FYPP) Plans #2 - #14. Examples:
— SBW (25) corresponds with FYPP #5
— SBW (31) corresponds with FYPP #11
SBW (2)
These drills review some of the content covered in Day 1 of practice

SBW (3)
Drills review some of the content covered in Day 2 of practice

SBW (4)

SBW (5)

SBW (6)

SBW (7)

SBW (8)

SBW (9)

SBW (10)

SBW (11)

SBW (12)

SBW (13)

SBW (14)

SBW (22)

SBW (23)

SBW (24)

SBW (25)

SBW (26)

SBW (27)

SBW (29)

SBW (30)

SBW (31)

SBW (33)
SBW (34)

SBW (42)
SBW (43)
SBW (44)
SBW (45)
SBW (46)
SBW (47)
SBW (48)
SBW (49)
SBW (50)
SBW (51)
SBW (52)
Team Drills
Backing Up (OF)


Backing Up (OF & Pitcher)
This drill (and the OF Backing-up drill above) leads to a revelation for the kids. The outfielders and pitchers are sprinting to assist in Team Defensive Play on every ball hit to the infield.
Rarely is a youth level game played without an overthrow; it is not unusual for games played at lower levels to have upwards of 10 missed throws. When our outfielders and pitchers are trained to sprint to get into backing-up position, we change the entire dynamic of the game.
Also, when outfielders are in the habit of sprinting towards every ball hit in front of them in the infield, we eliminate base runners attempting to advance extra bases, which eliminates more throwing attempts and subsequent missed throws and overall chaos.


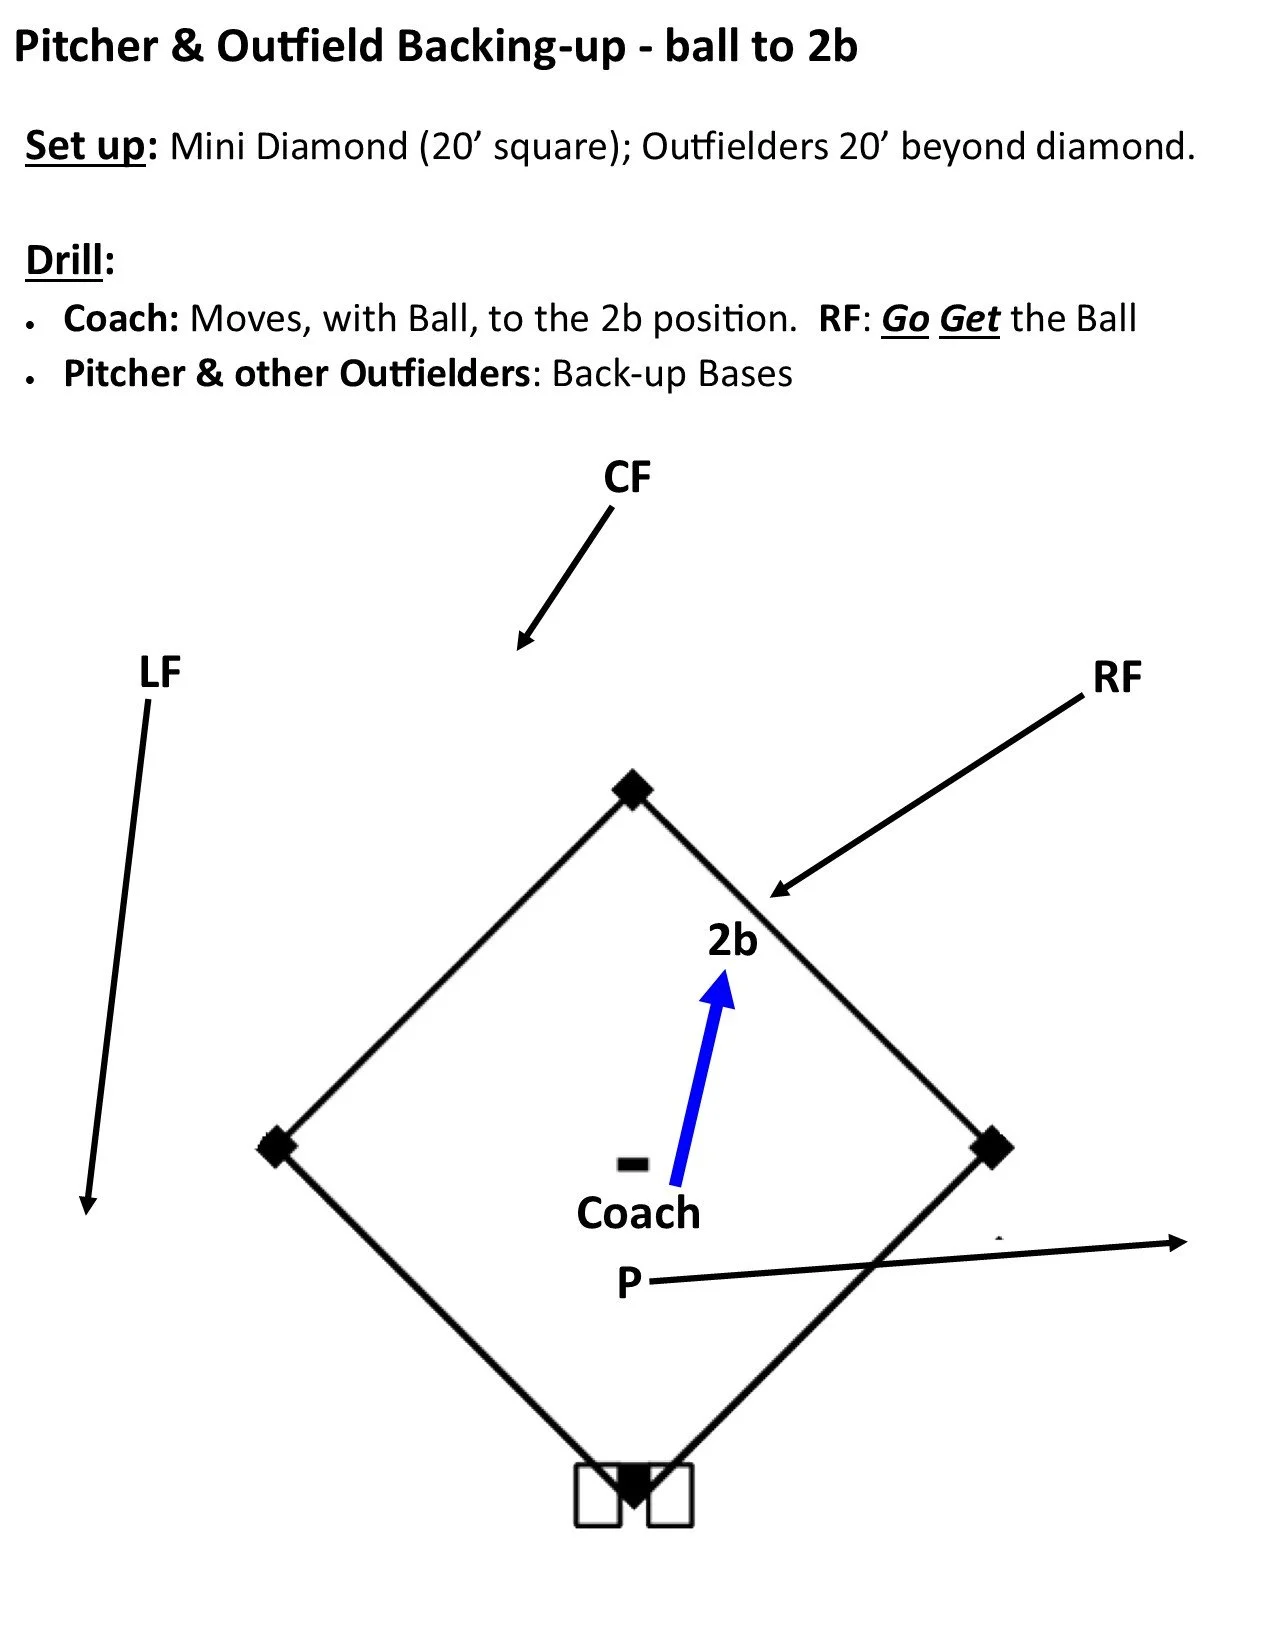


Bunt Defense


Eat It, Run It in


First & Third Defense


Fly Ball Communication
We don’t say, “I got It” …….unless we want a collision.

On a pop fly in the middle of the infield, the Pitcher can call off any other position by calling “I Got it!!”. The Pitcher is the only position that would use this phrase. We give this authority (and phrase) to the Pitcher for two reasons:
- At the youth level, the pitcher is often one of the best athletes on the field. We assign them absolute authority over all positions.
- When the Pitcher is in the area of a pop fly, it potentially creates a situation where three players are converging on the ball. The phrase ‘I Got It’ gives the Pitcher a different statement than what is used by the other positions. This insures that clear communication is maintained.
Additional positional combinations for this drill:
- LF Dominant over SS
- CF over RF
- 3b over C
- SS over 2b
- 2b over 1b


Ground Ball Communication
We use the same Subordinate (‘Mine’) and Dominant (‘Get Out!’) system as with Fly Ball Communication. Reminder: A player only calls ‘Mine’ or ‘Get Out!’ if they feel they can get to the ball.
In a Ground Ball situation, the player with their back to the base, or moving away from the base, is Subordinate (‘Mine’). The player facing the base, or moving towards the base, is Dominant (‘Get Out!’).
Examples:
Ball between the First Baseman and Pitcher: The First Baseman (with back to the base) is Subordinate and calls ‘Mine’; the Pitcher, who is facing the base, and running towards the base, hollers ‘Get Out!’, communicating they will field the ball.
Ball between the Third Baseman and Shortstop (force out situation at third base; 6-1 Play): The Third Baseman (with back to the base) is Subordinate and calls ‘Mine’; the Shortstop, who is facing the base, and running towards the base, hollers ‘Get Out!’, communicating they will field the ball.
When a player fields a ball near a base and wants to run to the base and tag it without making a throw, they holler ‘Get Out!’, telling the player covering the base to get out of the way.
Infield Base Coverage

Infield Base Coverage Responsibilities - Explained
The rule for infielders is ‘Play the Ball, or Cover a Base’. One infielder plays the ball. The other three, who aren’t playing the ball, cover a base.
The First and Third Basemen have one base they are responsible for; the Shortstop and Second Basemen have two bases they are responsible for; one to their Left and one to their Right. These two players, positioned in the middle of the field, follow this simple rule: If the ball is hit to your Left and you aren’t fielding the ball, sprint to the base on your Left; If the ball is hit to your Right and you aren’t fielding the ball, sprint to the base on your Right.
The rule for the players in the middle of the field is to “Always Move Towards the Ball”
When a Catcher participates in this drill, they also have a responsibility to move. When the ball is delivered to the infield the Catcher leaves the spot where they receive pitches, behind home plate, and moves to their ‘Position’, which is in front of home plate.
IMPORTANT NOTE: When delivering the ball to the first baseman or third baseman, only roll the ball about one third of the way toward the base. This forces the player to move far away from their base making it clear to the other infielders that it is not covered. When working on movement responsibilities this clear visual of an uncovered base helps the kids recognize where they are needed.
*Later in the season, after the players have demonstrated they clearly understand their movement responsibilities, the drill can be modified. The catcher calls out which base to throw the ball to. Using proper Underhand Toss technique, the player fielding the ball throws the ball to the base. If the ball goes to a corner base they, players then throw the ball around the infield, base to base; each using proper Underhand Toss technique. If the initial throw goes to second base, the ball is then thrown to first base, then to home plate.
Mass GB & FB (8)


Mass GB & FB: 5-4, 4-3, Toss

Mass GB & FB: 6-3, 3-6, Toss


Mass Ground Ball & Fly Balls
Our objective is to get kids as many reps (footwork) catching and throwing in a short period of time.
Set up two ground ball groups, allowing for balls to be delivered and thrown, where nobody is in the path of throws & potential overthrows. In most cases we want coaches rolling balls to players from 25’-30’ (Video Example; watch 3:42-4:37), though there are set ups where one, or both, coaches deliver the ball with a bat).
The kids in the ground ball group can split time between the two ground ball drills or spend the entire time at one spot. Kids spend half their time doing ground balls and half their time doing fly balls. A coach can modify the time and particular player(s) spend working on a given skill.
One outfield group working on fly balls tossed by the coach. Tossing is more accurate; it is a common practice at the professional level (Video example; watch 0:00-0:20). We eliminate flubbed hits from using a bat. No ‘do overs’ minimizes waiting around; gets players more reps.
Below are three examples of infield configurations. From these ideas, a coach can come up with many other set-ups for this drill.
Important Note: Remind players that Fielding the ground ball or fly ball is only 50% of the skill work. We put equal emphasis on the player making a Quality Throw each time (regardless of how well they field the ball).
Rundown - 'Ambush'


Wild Pitch / Passed Ball Communication


Three Group Drills
Rundown (‘Ambush’)


Three Groups (2)


Three Groups (4)

Three Groups (5)


Two Groups - Team Drills (6)

Two Groups - Team Drills (7)
(1) Eat It, Run It In (2) Run Down - ‘Ambush’


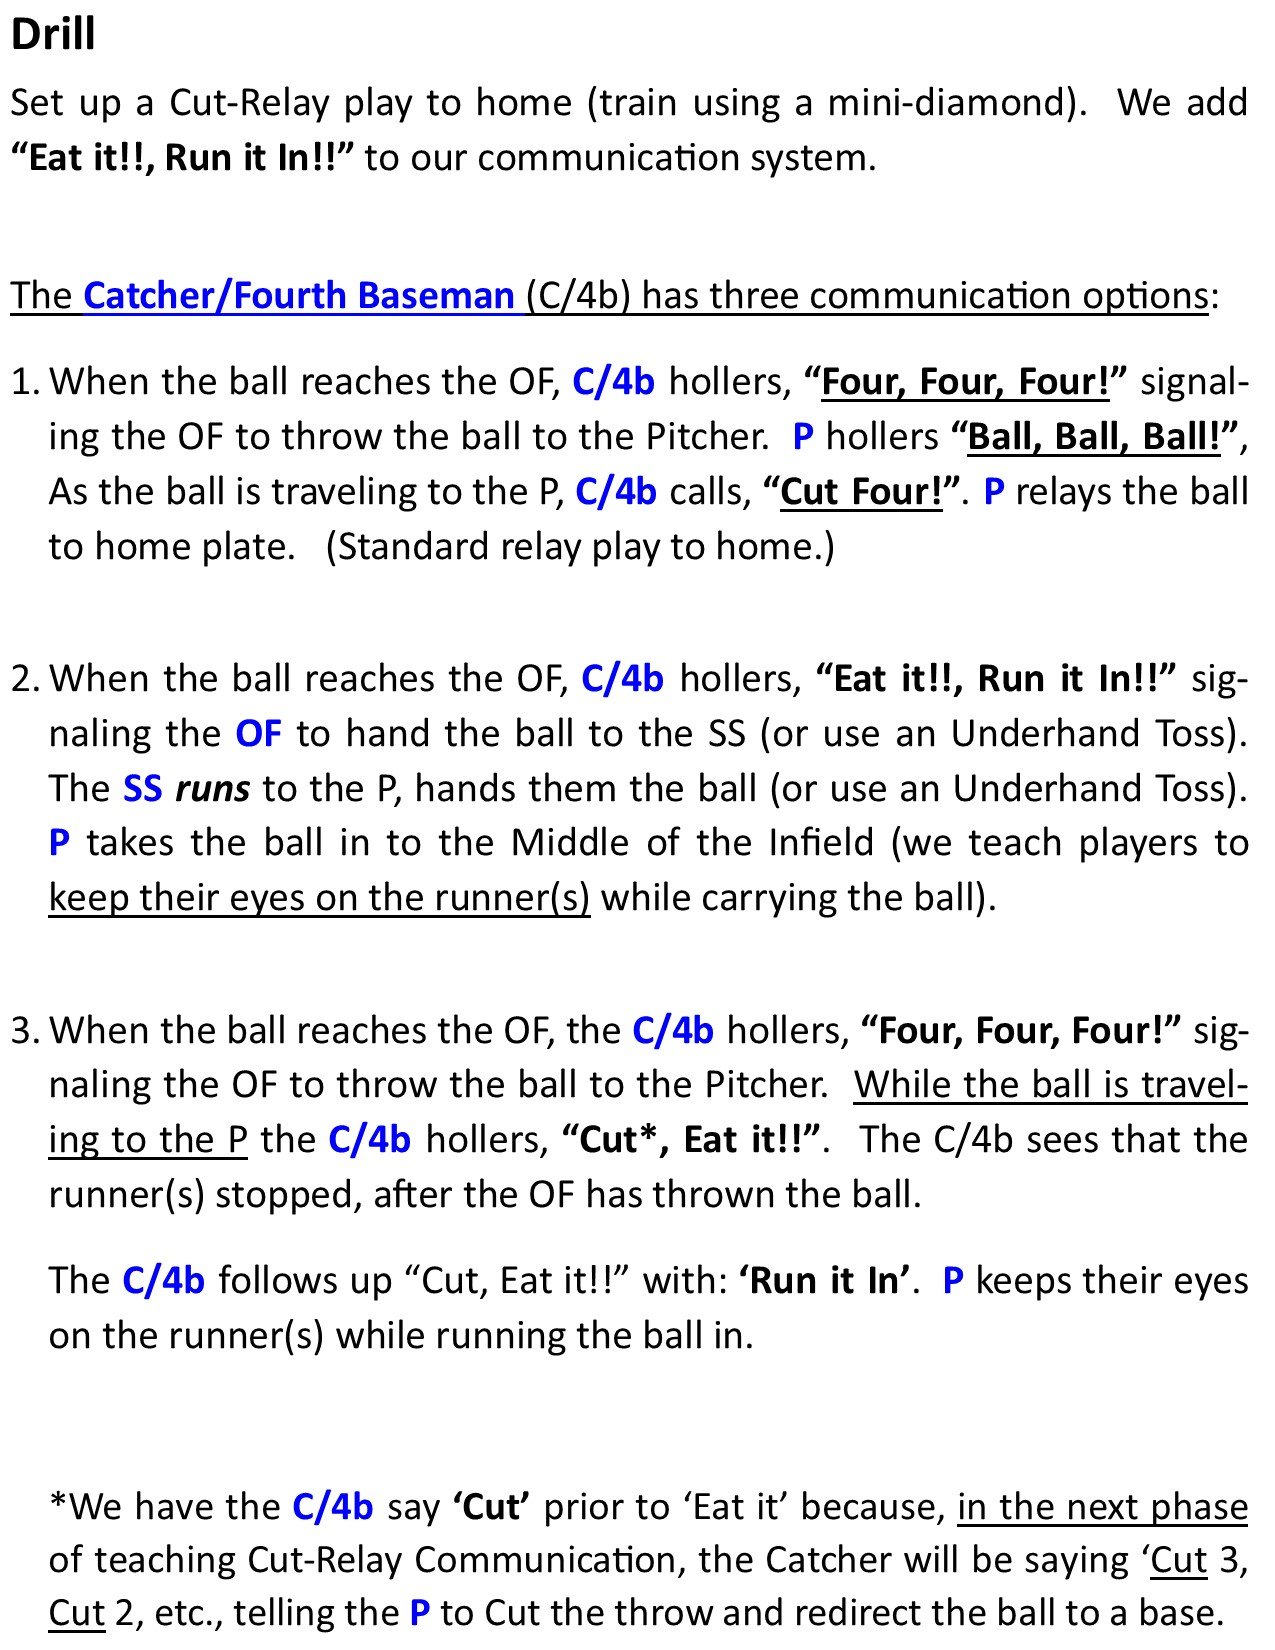
Three Groups (9)


Three Groups (11)

Three Groups (25)

Three Groups (26)

Throwing & Catching
Catch, Tag & Throw


Catch, Tag, Power Position


Relay Footwork

The Glove - Catching the Ball


Throwing Action
The information below describes the ‘Infielder’ throwing action (50’-70’). However, at the youth level the majority of throws, including outfielders’ throws on relays, fall within this distance range.
The throwing action has three parts (note that the word ‘arm’ is not listed):
- Leg
- Elbow
- Wrist
Once in a Power Position (elbows at shoulder level) with the glove-side of the body pointing at the target, the throwing action begins. (first picture, after skeleton, below)
Back LEG pushes off the back foot and drives the torso straight forward towards the target. The Leg Drive is made with a great amount of force.
;;lk;l;l
Glove ELBOW pulls straight back and stops at a point a bit before reaching the side of the torso. When the glove-elbow stops, the glove side of the body firms-up, stabilizing the glove side, which works as a Hinge during the throwing action.
The upper part of the throwing arm and torso work as one piece (picture of skeleton). The area of the body that works as one piece is illustrated by the red line. The Leg drive, primarily, and the glove-elbow pull, result in the torso turning to face the target. When the throwing-arm elbow is passing the body, or a hair past, the WRIST snaps to finish the throwing action
The upper part of the throwing arm and elbow move Sideways*, remaining at shoulder level, when moving forward past the torso. The throwing hand is outside the elbow as it moves forward. (second picture following the skeleton)
* Not to be confused with ‘sidearm’, which has the elbow below shoulder level (not good).
The WRIST Snap begins as the throwing-arm elbow is passing the torso. The Wrist-Snap action involves the fingers and hand, of the throwing-arm, snapping down with great force.
The energy of the Leg Drive and Wrist Snap carry the throwing arm straight forward towards the target. Following the Wrist Snap, the throwing arm remains at shoulder height. (third in the series of throwing pictures)
Older, stronger players generate enough forward momentum from the Leg Drive and Wrist Snap, that the momentum of the throwing arm carries the arm across the body; the arm remains at shoulder level throughout the action. (fourth picture below)
*** The throw is a sideways Slinging action …not ‘overhand’ ***
Finally…
- Head Control is a critical piece for throwing accuracy. The player ‘Faces’ their target Before, During, and After the throw.
- The Forward Momentum of the throwing action continues after the throw. This momentum carries the player a step or two straighttowards their target after they throw the ball.
Drills
All 6 drills are done without a ball. These can be done anytime, most anywhere. (‘Wrist Action’, for example, can be done while riding in the car.)
1. Turn & Pull
(Objective: train the upper arm and torso to move as ‘one piece’ - red line in the picture)
- Start in a Power Position (Elbows at shoulder level; feet wider than the hips)
- Turn feet/legs, and pull glove elbow straight back, stopping when it reaches the side of the torso
- Finish with throwing-arm elbow and hand a bit past the head & torso
- Zero effort with throwing-arm muscles
2. Drive & Pull
Same as above. Difference: back leg pushing off the back foot, driving the body straight forward. Finish with body over front foot; throwing-arm elbow and hand a bit past the torso and head. [Again, Zero effort with throwing-arm muscles]
3. Wrist Action
Set up in finish position of the ‘Drive & Pull’ action. Bending at the wrist, snap the fingers and hand straight down with a good amount of force. Slowly raise the hand and fingers straight up. Repeat 10x (younger kids 6-7x).
4. Drive & Snap
A combination of ‘Drive & Pull’ and ‘Wrist Snap’ actions. Emphasis on the Leg Drive (using a good amount of force). As the throwing-arm elbow is passing the head, execute the Wrist Snap, with maximum force. Allow the momentum generated by these two actions, to take the throwing arm to full extension, forward, with the throwing arm remaining at shoulder level. Allow the body to move forward a step or two after releasing the ball (this forward action is a result of the momentum created by the Leg Drive and Wrist Snap).
——————————————————————-
Move Feet to Throw (see video below)
5. Shuffle (three shuffles)
Set up in a Power Position; maintain elbows at shoulder level throughout the drill. Push off the back foot with maximum effort; execute 3 Shuffles, driving the body forward, gaining as much ground as possible*.
Repeat 3 shuffles. This time make them quick, and rhythmical, covering a distance that is natural/normal.
- The objective of the first set up shuffles, is to help the player(s) discover the power their legs can generate*
- The second set of three is to help the player(s) develop the skill, and rhythm, of shuffling forward (gaining ground) towards their target.
* this set of three may only be needed on the first day; might do it on the second day…or done down the road as a reminder to fully utilize the power of the legs prior to making a throw.
6. Shuffle, Shuffle, Pull-Snap (simulates the entire throwing action - ‘Feet & Wrist’)
Set up in a Power Position; shuffle only two times, give a bit of a pull with the glove elbow. As the throwing arm-elbow is passing the head/torso, Snap the Wrist. Allow the throwing arm to fully extend, forward, remaining at shoulder level. Allow the body to move forward a step or two following the throwing action.
The first 1:30has short clips (1-2 seconds each) at regular speed. They are followed by the same videos in slow motion, making it easy to see the arm action.
These illustrate the sideways ‘slinging’ action of the throwing arm. The throwing-arm elbow remains at shoulder height, while moving forward. The throwing action is completed with the wrist snap.
On each throw, the players gain ground towards first base (Move Feet).


Underhand Toss

VIDEO - Underhand Toss (watch: 0:00-0:10)


(Drill can also be used to train: Throwing on the Run)